• Skip to primary navigation
  • Skip to main content

My Lifestyle Dream

The journey of a thousand miles begins with one small step

  • Home
  • Print on Demand
  • Website Monetization
  • Dropshipping
  • Matched Betting
  • Social Trading
  • Blog
  • Travel
  • About

Make Money Online

Tier 4000 : How to Quickly Scale your Merch by Amazon Account

21st June 2019 By martinos74 Leave a Comment

Tier 4000 Merch By Amazon

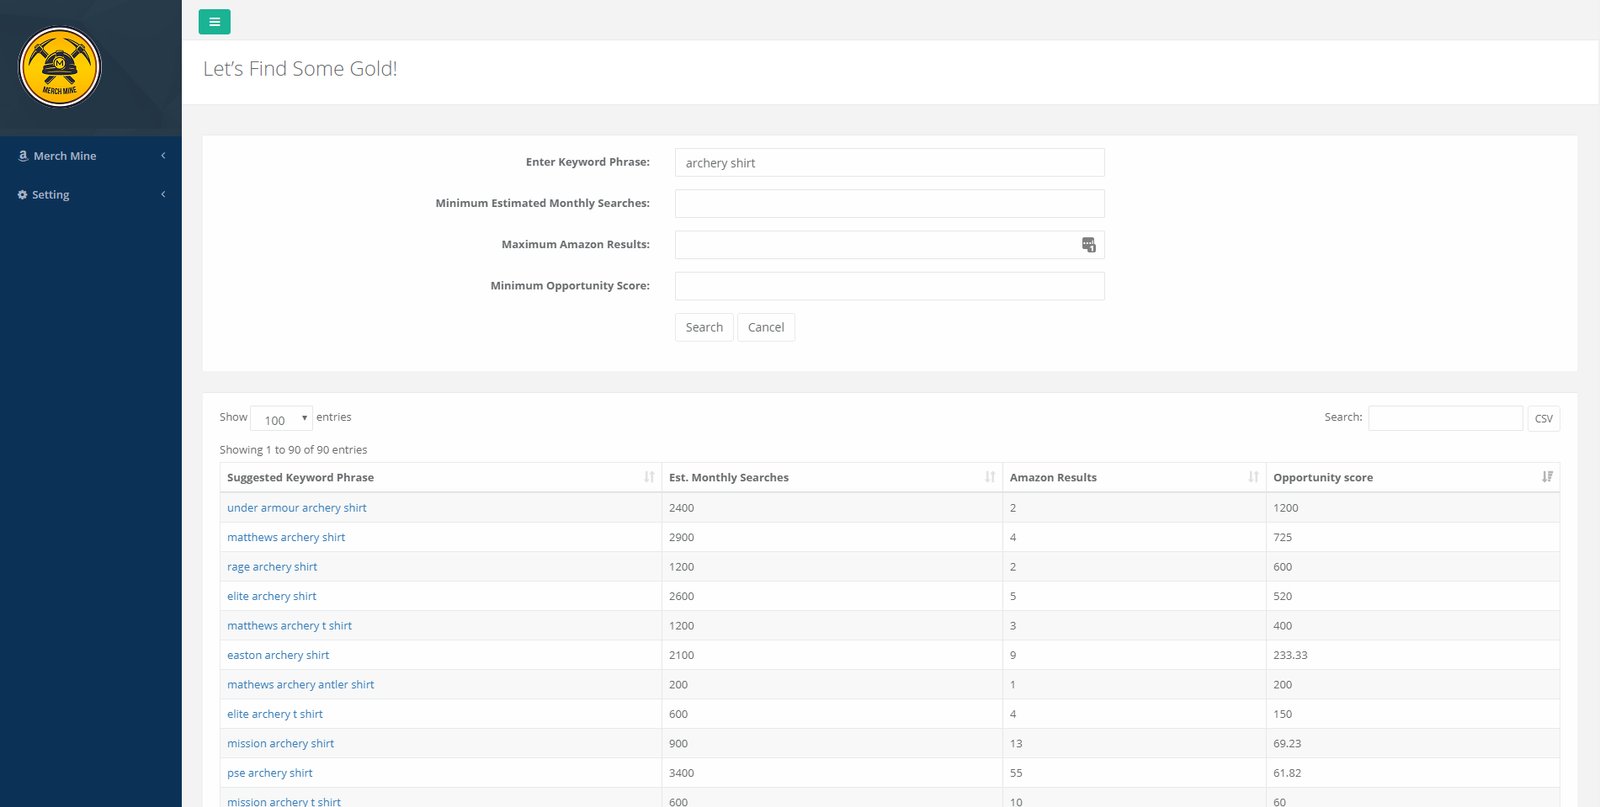
Just under 3 months ago I was tiered up to Tier 2000 and was hoping that this was going to be the turning point in Merch by Amazon and I would start to return a profit after all the hours I’d been putting in.

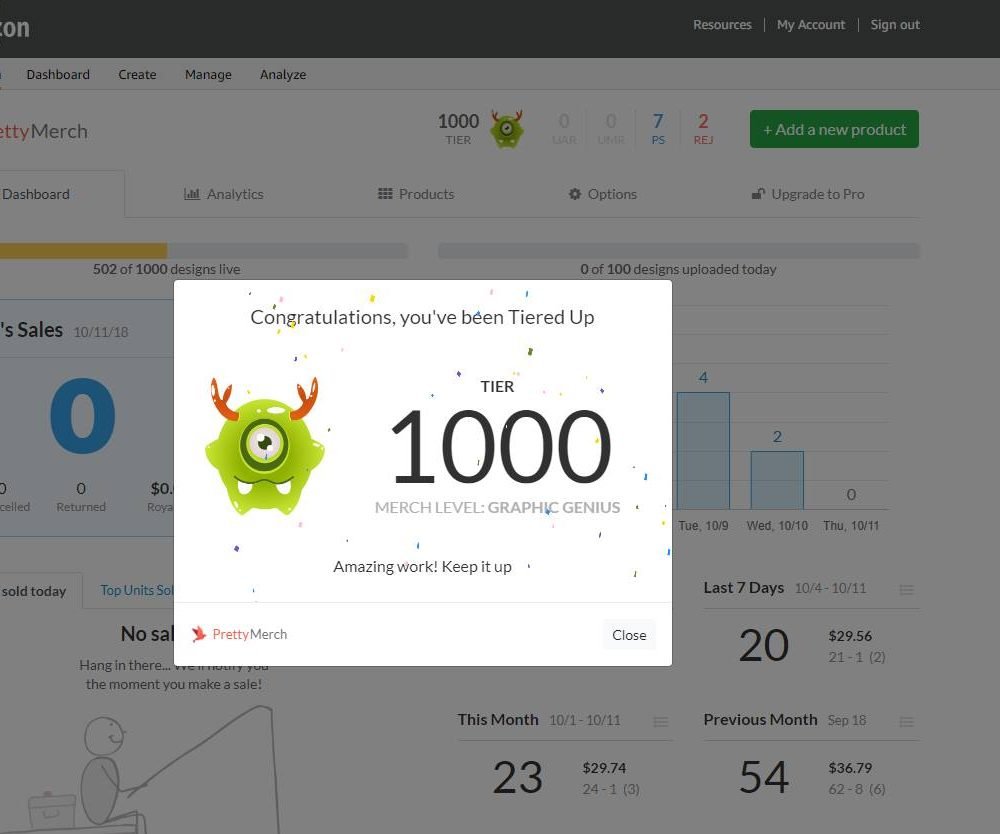
I’ve been continually uploading and producing new designs and last week I passed the 2000 sales mark and got one of the beautiful notifications in Pretty Merch that we all look forward to:

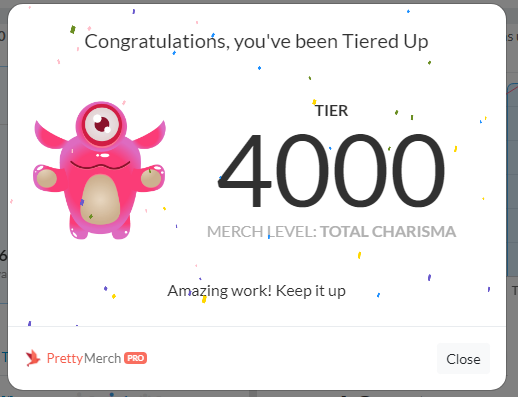
So you may be wondering how I managed to tier up so quickly and if there are any secrets to my success so far and how I managed to get to Tier 4000…

Hard Work

Well, unfortunately, the honest truth is that there is no silver bullet and that most of this success comes from a direct result of the effort that I have put in.

There are loads of different ways that you can approach Merch, from focusing on smaller niches, jumping on trends, finding evergreens, trying to penetrate bigger niches, using AMS etc etc, but my recommendation would be to find one approach that works for you, that you can keep repeating until you start to see sales coming in.

My approach to Merch so far has been to try and work in smaller niches, where there is less competition, but also less sales. Focusing on selling a few shirts a month of lots of different designs rather than having a best seller really appeals to me as you stay under the radar and away from the copy cats.

That being said… the thing that pushed me over the line recently and brought me in a huge number of sales in the past few weeks was a trend that I jumped onto…

Chasing Trends / Events

If you’re in a low tier then this can be a great strategy to get tiered up quickly, because if you can jump on a trend early enough, your sales will spike and those tiers will come tumbling down for you.

Check out the sales that boosted my account on a trend I got on recently:

If only my figures could stay like this!

The trouble is… how do you get on a trend?

For me I think there are 3 key factors to do this:

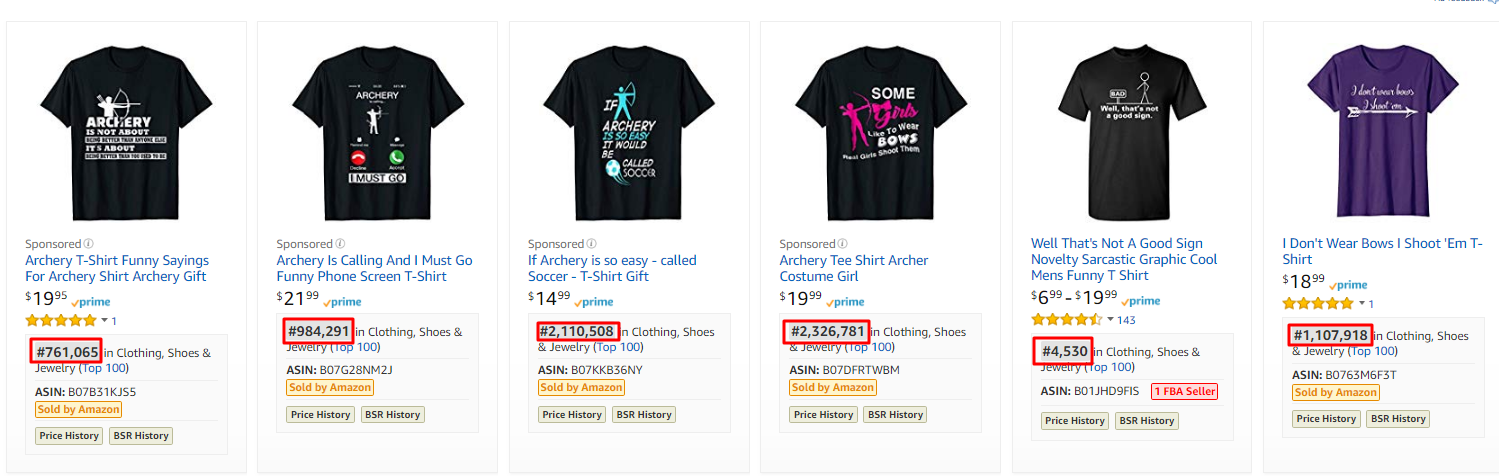
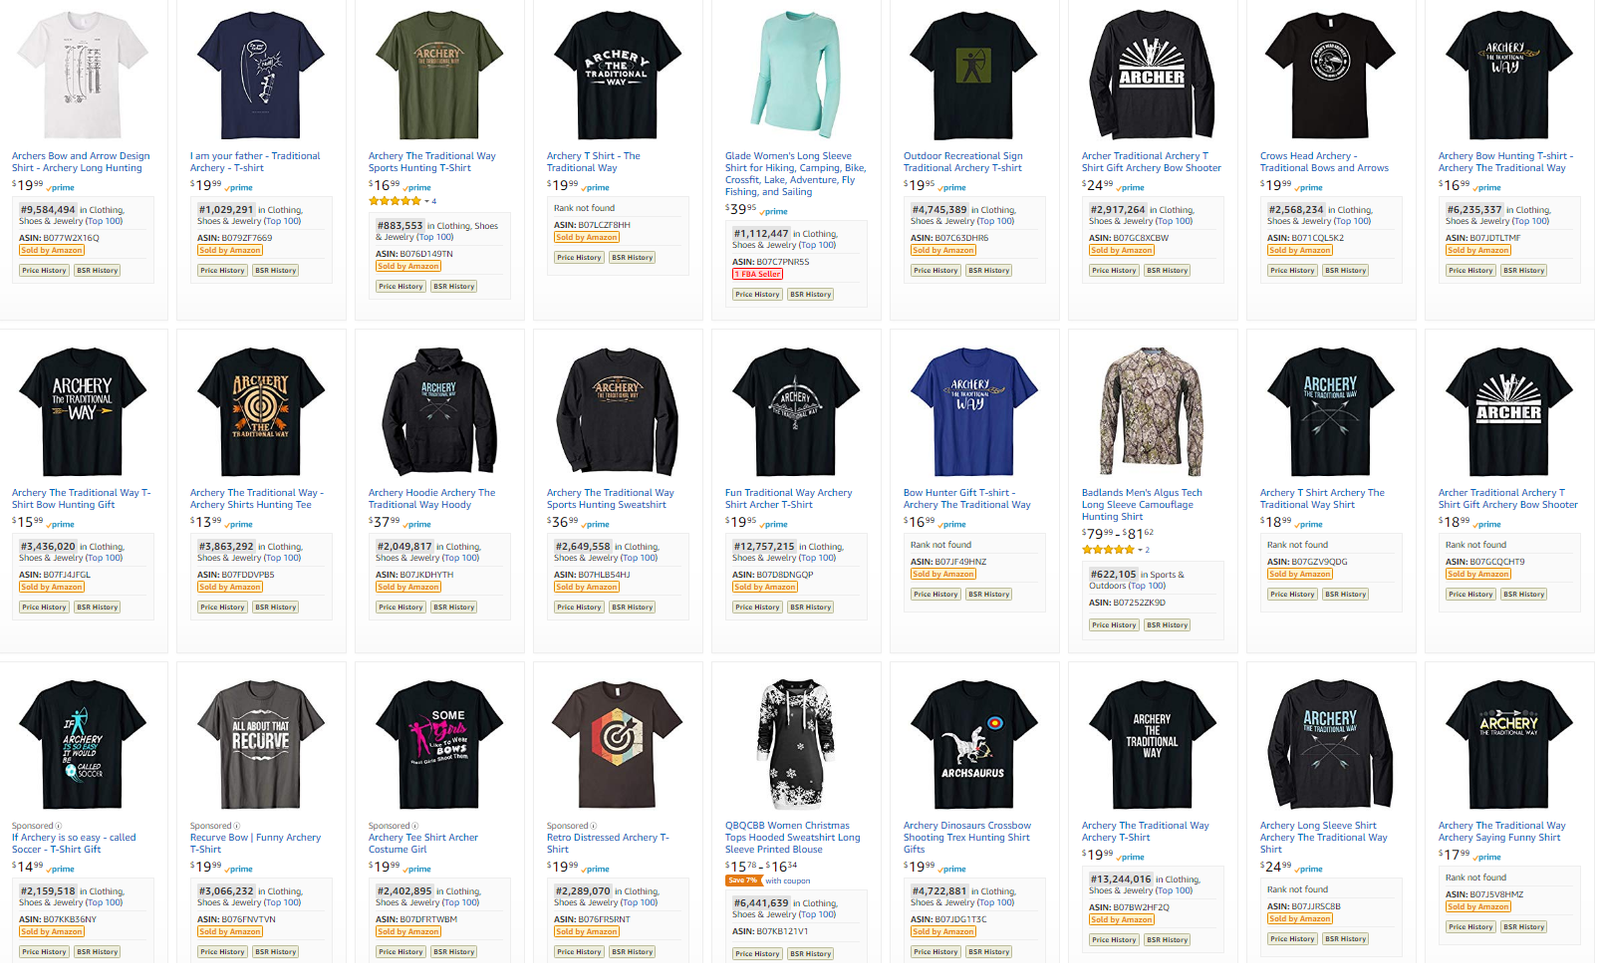
1 – You need to be one of the first to market.

Start by looking at events, celebrations, festivals, holidays that are 4 months away from today’s date. There are heaps of calendars you can find to help you with this and just get in a good practice of checking these out on a weekly basis and making some designs for these themes.

2 – You need to have a great design

Focus on creating a quality design, rather than pumping out loads of cheaper variations. I’d recommend paying a little more for an illustrator if possible or purchasing some relevant designs assets to make your design stand out. Remember, it’s going to get very crowded so your design is really going to need to jump off of the page

3 – Get Eyes on your Design

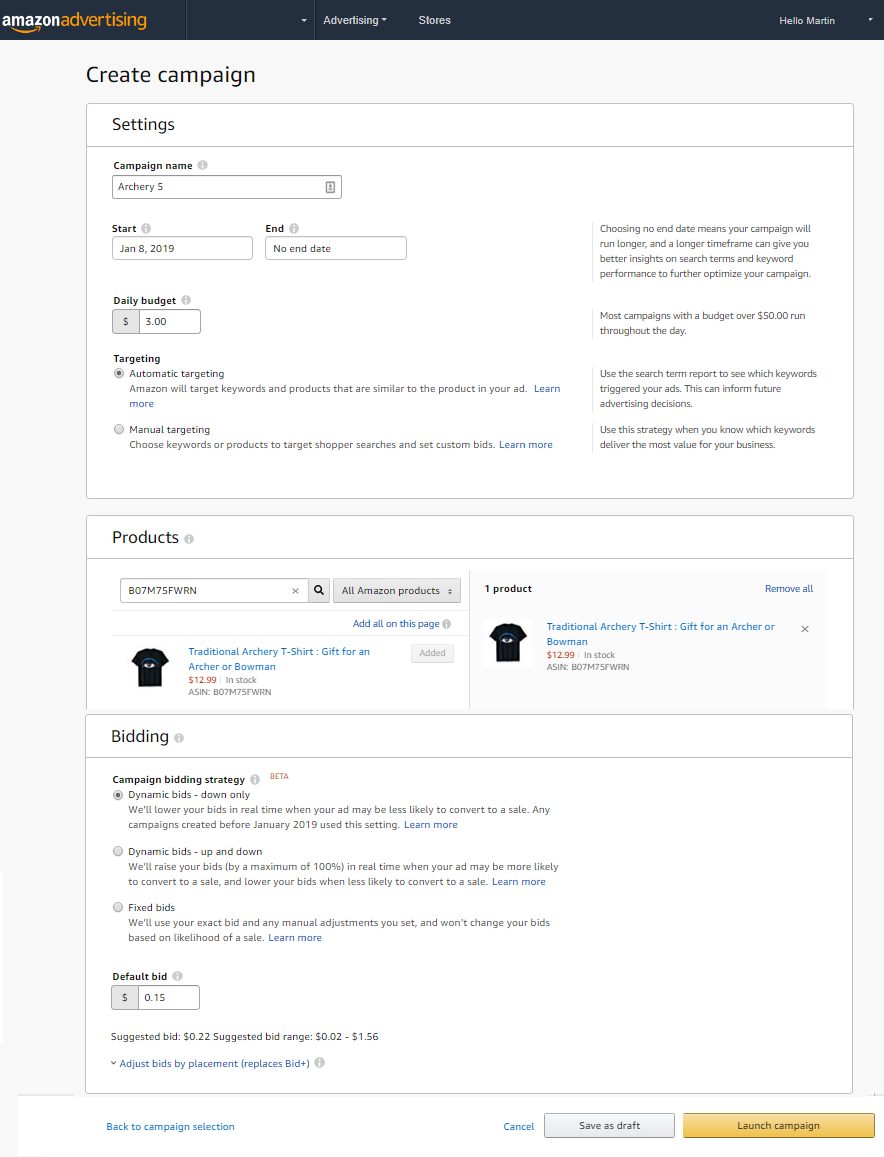
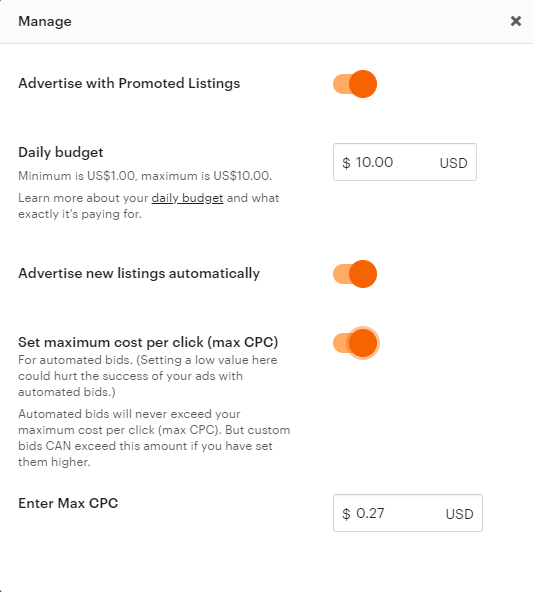
Creating a great listing with keyword optimised titles and bullets is a MUST, however, once you’ve done this, dust down your wallet and spend a few bucks on AMS to really push your design out there. If you’ve got a good design then using AMS to push it in front of a captive audience will really boost your sales.

The beauty of AMS is that not only will you make sales through your advertised listings but your BSR will improve and you’ll make more sales organincally as well.

This is also a good way to test your design and potentially make subtle changes. For example if you’ve got 10 clicks on your design and no sales, then maybe try a different version of the text, swap out the font or change the design slightly.

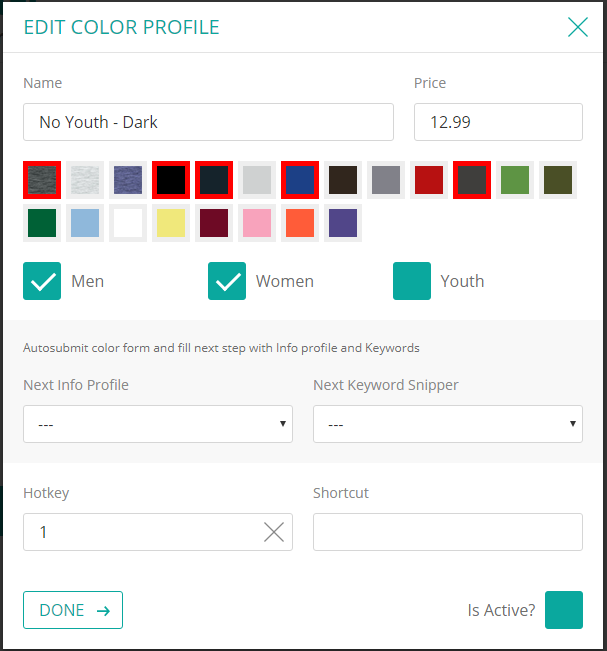
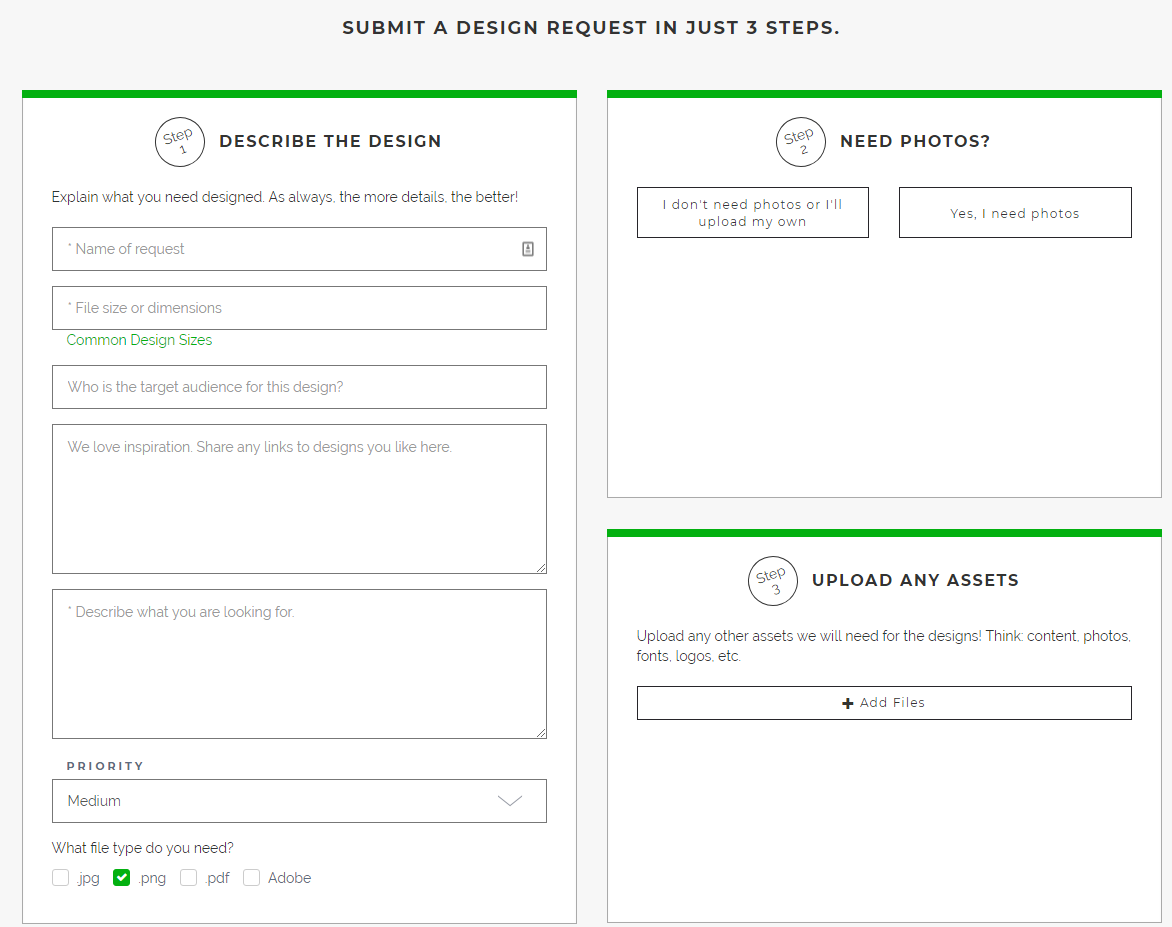
The Mutli Uploader Tool

Merch by Amazon Multi Uploader

If you haven’t got access to it yet, then this is what it looks like and is simply a HUGE, timesaver. Full credit to the Merch team as this tool is awesome and means you can upload your design to 10 products in one go, as well as T-Shirts to the UK and Germany.

The thing I love about this most of all is it shows us the direction Merch is going in and I wouldn’t be suprised if in a few years you can publish your design to 20+ products in a variety of markets at the click of a button.

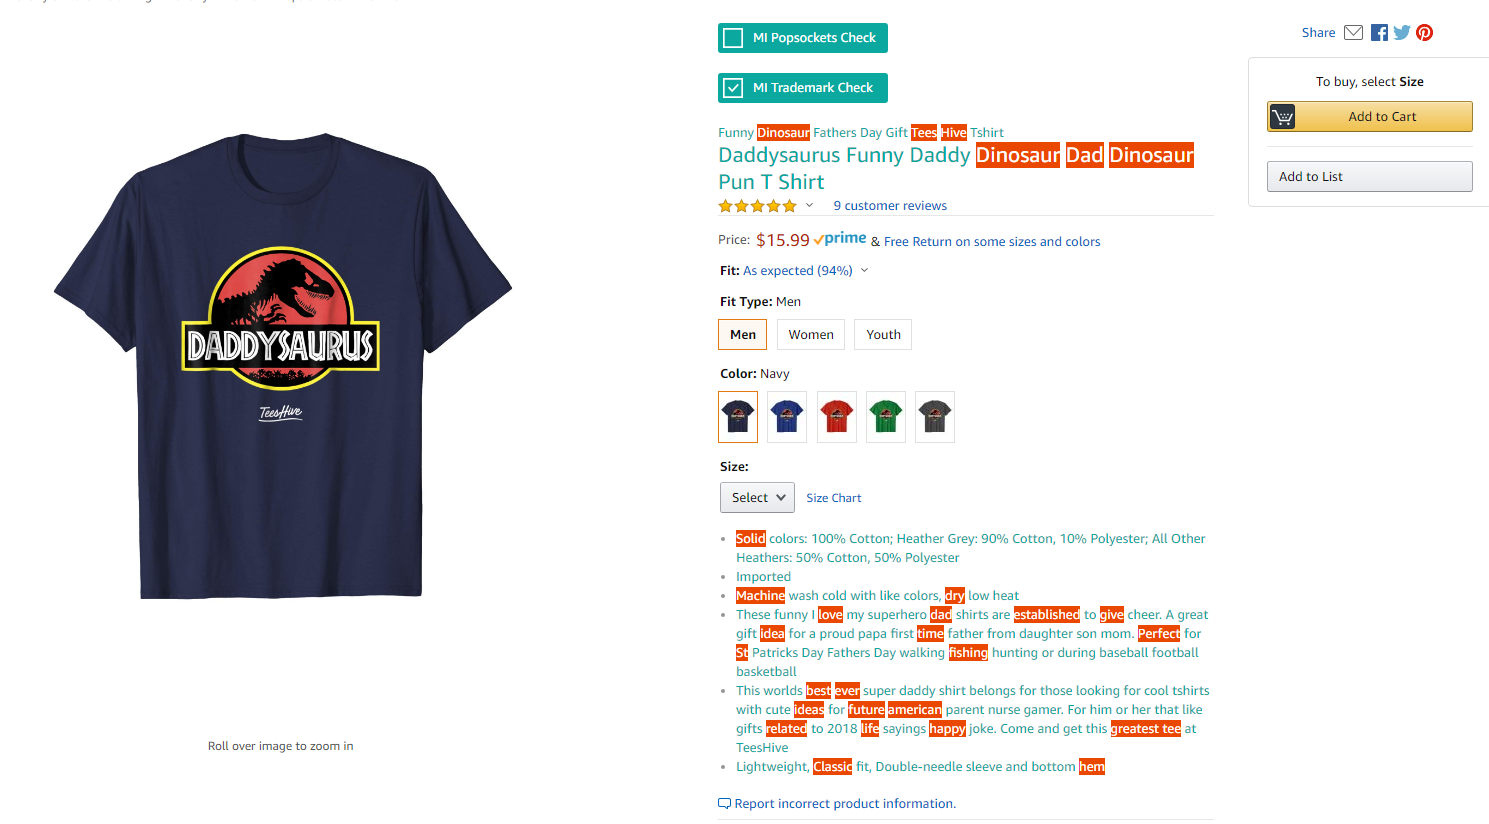
The only downside that I can see with this is that you need to be extra careful about Trademark violations and adding designs suitable for children as there’s been a few times when something slipped through my process and resulted in 10 rejections just from 1 mistake…

Tank Tops are Here

Another reason for my tier up recently has been the addition of tank tops, which are doing pretty well for me in certain niches. Not sure how long this will last though as I guess they are more of a summertime thing, but at the moment, they’re a perfect compliment to my T-Shirts.

Consistency

I think one of the key’s to success with Merch is consistency and one of the driving forces for me has been my subscription to Design Pickle. I bought an annual subscription with them last year and have been really happy with the service so far.

The main thing I like is that I need to keep creating ideas for my designer to work on, otherwise, I’m paying for him to do nothing… and being the tight ass that I am, I don’t like wasting money.

This pushes me to have a backlog of ideas primed and ready for him to work on and means I have a steady stream of designs that I can upload to Merch and to the other platforms using Orbitkit

The 4 Day Week

One other thing that has really helped me dial up things in the past 6 weeks since I came back from travelling is that I’ve gone down to a 4 day week at my current day job.

I can not stress how awesome this is. I wake up on Monday mornings and I don’t mind going to work, as I know I only have 2 days of work to do, before I can spend the whole of Wednesday cracking out stuff for Merch.

This just gives me enough time now to have a cool day job, build up my Merch business and gives me time to do some of those enjoyable things in life like spending time with my girlfriend, enjoying the sunshine on the 1 day we get a year here in the UK, and of course it means I get more time to go to the boozer as well hahahah!

Seriously though, as I’m a freelancer, working 1 day less a week is a big dent in my pay check, however, this is another huge motivation to build up my Merch business to at least equal the amount that I would have earned on that day… the good news is that I’m not that far away from achieving this!!!

What’s Next?

My goal is to reach Tier 6000 by Q4 and I think that should be achievable if I keep on focusing on Merch.

I’m going to keep using Design Pickle to roll out my scaled designs and using them for access to Getty Images, however, I’m also trialing Penji at the moment (mainly for custom illustrations) and have hired 4 illustrators on Upwork to roll out a series of tank tops for me. I’ll probably take on the person who provides me with the best designs for custom illustrations as well.

I’m also going to try a different angle and focus on more quality designs and entering larger niches to see if that can work. To be honest the thrill I got from the trend I got onto recently was incredible and I want to have that feeling again. It got to a point where the Pretty Merch dings were becoming quite annoying…. but that’s one heck of a position to be in!!!

Anyway, onwards and upwards guys…. stop reading this and get back to Merch!!!

—

If you enjoyed readying this article, then why not PIN IT!!!

Tier 4000 Merch by Amazon

Filed Under: Print on Demand Tagged With: merch by amazon

Merch by Amazon Tier 2000 : Time to Dial it Up!

27th March 2019 By martinos74 Leave a Comment

Tier 2000 Merch by Amazon

This week I finally got tier 2000 after just over 10 months in Merch and selling 1034 products. It’s taken a huge amount of work to get to this stage and most of my focus over the past year has solely been on Merch, but I’m hoping that now that I’m in Tier 2000 I can step this up another notch, start to play with the big boys and see this develop more as a business.

What Difference will Tier 2000 make?

Up until this point my strategy has just been to sell as many Tshirts as possible, with the sole purpose of getting tiered up and giving me more opportunities in the future. I’ve been building up my stock of design assets and refining my process, and so far haven’t been too concerned about making money from Merch.

Now that I’m on Tier 2000 I feel that I’ve proven this business model can work, that I am good at it and if I apply the same principles and scale up, my buiness and returns should increase as well.

Expand into Other Products / Markets

Being in T2000, will give me more opportunities to expand out into other products (up until this point I’ve only listed standard Tshirts) and I’d also like to list more shirts in the UK market.

It doesn’t sound like it has provided a lot of return for many people, but I’d like to try this myself and see if I can make it work… after all my competitive advantage is that I’m English and understand the humour and the market a lot better than the US Market.

I also speak near fluent German, so may try listing some designs that I feel could sell well in Germany.

Experiment

Having more slots available has another advantage for me in the fact that I should now be able to experiment more. I have a bit more flexibility to upload similar designs with slight variations in texts, colours and design assets to see if this will make a difference.

Scaled Designs

I’ve created a number of template designs whilst I was on T1000 and should now be able to quickly roll out a large number of designs. For example, I have a number of US State themed designs that I’ve only created for a few States.

Up until now i’ve been using Design Pickle to create my designs and these guys are perfect to help you create the inital template and then roll these out to multiple niches. The best thing about their service is for an extra $35 a month you get access to Getty Images source library which is freakin’ awesome value!!!

Text Based Designs

Whilst doing my research I found a number of keywords/niches that looked like they had evidence of demand and had 0 or very few listings on Amazon.

I hadn’t bothered creating any designs for these previously as I didn’t want to use up my slots or have my designer spend any time on them. Instead what I can do now, is throw up some text based designs and see if any of those start to sell.

Because there are only a few listings on Amazon doesn’t necessarily mean that there is no demand in the niche… it might just mean that other sellers haven’t discovered this niche yet.

Re-Upload

I’ve also had about 400 designs fall off of Amazon since I first uploaded them. Some of these were just bad designs, but a lot of them may have been targeting the wrong keywords or need a tweak to the listings, so I now have more slots available and can get back on the case and reupload these.

Make a Profit

Now that I’ve put in a lot of hard work to get to T2000, it feels like it’s time to start make some hard cash back on the time that I’ve given to Merch.

I’ve learnt a lot of lessons about designs, what sells, which niches to go for and how to use AMS over the past 10 months, but now I want to start to see some financial reward for the time that I’ve given to Merch, and hope to get my royalties up to around $1000 per month in the next 3 months.

It’s definitely not a get rich quick programme, and I still need to keep on grafting away to make this a sustainable business, but the royalites are still steadily growing, and I have an endless stream of ideas that I can use to create designs with, so theoretically the royalites should keep on growing.

The main problem I’m facing as ever is time. At the moment I’m travelling through South America for 3 months, and had hoped that I’d be able to dedicate more time to Merch and my other side hustles, but I’m finding that I have even less time than when I was working full time!!!

There’s mountains to climb, oceans to swim in, fiestas to attend and lots of cerveza to be drunk instead… really is a tough life eh but that is part of my lifestyle dream which I’m getting a little closer to day by day

To read about the exact process I used to get to Tier 2000 read this article

Filed Under: Print on Demand Tagged With: merch by amazon

Merch By Amazon : Step by Step Process

13th January 2019 By martinos74 4 Comments

Merch By Amazon Process

I’ve been working fairly intensively on Merch By Amazon for just over 9 months and have finally managed to find a repeatable process that I can use to research, create and list unique designs on Amazon and across multiple Print on Demand Platforms.

Initially when I started I spent most of my time stressing whether I’d done something right, or wondering if I was wasting my time on certain designs as I had no real way of telling if a design would be able to sell or not.

However, with a few tricks and a few tools (Some free, some paid for) I think I now have a process that takes away a lot of the mystery and should be a fairly simple step by step process that you can follow to expand your design portfolio.

WARNING: This is a pretty long article so I’ve split it into 7 separate steps, each with a video showing you the exact process I follow for Merch by Amazon.

Step 1 – Finding a Niche with Low Competition and High Demand

This is probably one of the most important steps for you to master, especially when you are in the lower tiers as you really want to make sure that your designs have a decent chance of ranking.

Keyword Analysis

Merch Mine

For me the quickest way to do this is to use some software called Merch Mine.

Simply put this allows you to add a seed keyword such as ‘Archery’ and it will return a list of similar keywords, with the following data as shown in the screenshot below:

  • Estimated Monthly Searches – This is based on data from Merchant Words, which an estimated average monthly search volume. This doesn’t come from Amazon itself but is a good approximation. Read exactly how they calculate it here
  • Amazon Results: Shows you the number of results that are presented in Amazon when you enter the given keyword
  • Opportunity Score: Is a simple calculation of the 2 previous metrics to give you a number that you can glance at quickly to determine if the keyword is worth going for or not:
Merchmine Search Results

TIP: To ensure that you get a decent set of search results back I usually add the following values to pre-filter the search:

  • Estimated Monthly Searches – 800 (Ensures that there is enough volume)
  • Amazon Results: 400 (Ensures that the niche isn’t flooded yet and you could still rank with this number of shirts)
  • Opportunity Score : 5

EXAMPLE : From the seed keyword of ‘archery shirt’ I found the keyword ‘Traditional Archery Shirt’ with the following stats, which look good to me:

  • Estimated Monthly Searches – 1200
  • Amazon Results: 144
  • Opportunity Score : 8.33

Analysing Search Results in Amazon

The next thing you’ll need to do is make sure you have 2 Chrome extensions enabled:

DS Amazon Quick View

DS Amazon Quick View Extension
BSRs Highlighted with the DS Amazon Quick View Plugin

This is an essential plugin to use and will quickly help you determine whether any of the shirts on that page are selling or not.

Typically a BSR of 100,000 means that the product is selling once per day. A lot of people will only go after keywords where shirts have a BSR of less than 500,000 but my personal approach is to go for anything that shows some track record of sales.

My strategy:
If there are a few shirts with high BSRs then it’s still worth going for and my strategy is to have thousands of shirts selling once or twice a month rather than one shirt which sells a heap…. the main reason for this is that I won’t get the attention of the cheap scumbag copycats, who will just steal your best selling shirt design and sell it at a lower price. My experience so far shows that as soon as you get anywhere near to a BSR of 500,000 you are likely to have someone copying your shirt pixel for pixel.

Keepa

Keepa - Chrome Extension
Keepa Amazon Price Tracker Extension

To get an even more accurate picture of how well a particular shirt is selling you’ll need to install the Keepa Chrome extension which is also free. It’s a little bit glitchy but for most products will show you a graph of the history of the BSR for that product.

This means that when there is a jump vertically down in the graph, a sale was made. As you can see in the image above the red spots I’ve highlighted are where this particular product made a sale and is a great way to determine demand in the marketplace.

EXAMPLE: If you do a search for ‘Traditional Archery Shirt‘ in Google you’ll see a page of results as below.

Notice the key thing here is that there are lots of products with BSRs that range from 500,000 to 3 million.

This means that the products aren’t selling in massive numbers, however, there is definitely a demand that is worth us looking into.

Traditional Archery Amazon Results
Traditional Archery’ Search Results with BSRs

Step 2 – Brainstorming Ideas in the Niche

So we’ve found a niche that looks promising, but we probably know nothing about that niche, so how can you come up with a design that is relevant to the audience and will ultimately make them want to purchase your shirt?

Well here’s 3 tips that I always use to brainstorm my ideas:

Search Google for Memes

Traditional Archery Memes
Google Meme Search Results

The first thing I’ll do is goto Google and do a search for memes. A lot of these will be trash and unusable but you will always find a few gems that you can use for your Tshirt ideas.

The things that you are looking for in a meme are:

  • Text is short and punchy enough to fit onto a Tshirt
  • The concept can be translated easily onto a Tshirt
  • The concept is unique to your niche, or references niche specific terminology

Scan through all of the images that are shown and take screenshots of the images so that you can review later.

The good thing about this approach is most of these memes will have been created by people who have inside knowledge of the niche, which takes a lot of the research load off of your back!!!

Search Pinterest

Traditional Archery Pinterest Board
Pinterest Search Results

Pinterest is another goldmine of ideas that you can use for your shirts. This is perhaps even better than the Google search because a lot of these boards would have been specifically curated by enthusiasts in the niche that you are trying to enter.

Just enter your search term and either search for specific boards related to the niche or just browse the hundreds of images that appear and screenshot any ideas you like for later.

Search for Jokes / Sayings

From my experience so far it’s pretty clear that the best selling shirts are ones that have a touch of humour or have a cool saying that is relevant to the niche that you are targetting.

Put yourself in the mind of the buyer and why they are buying the shirt. Most of the time what they are actually doing is saying to the rest of the world “Hey, I’m really interested in this niche and want you know that I am because I think it makes me look cool/interesting/exciting/intelligent“

I’ll always do a quick search in google for funny sayings / jokes and scan some of the forums in the niche, as they will usually have a funny jokes section as well.

This gives you great inside information from what people in the niche are actually finding funny…. which should translate to sales!

Again, remember that the jokes need to be pretty short and punchy where possible and be able to translate well to a Tshirt, so that other people will be able to read the pun and get the joke instantly.

EXAMPLE: You should now have created a single document that has collated all of your ideas from the sources mentioned above.

Here’s what mine looks like for Traditional Archery:

Traditional-Archery-Ideas-Sheet
My Traditional Archery Ideas Sheet

Step 3 – Creating your Design Briefs

So now that we’ve done a lot of research and got a good feel for the niche, we need to break some of these ideas down into actionable briefs that we can give to our designers or to work on ourselves.

The key here is not to copy the source designs but use them as inspiration to create your own unique or improved version, because these will likely sell more easily and you don’t want to become one of those copycat scumbags do you???

Check Amazon for Existing Designs

The first thing I always do is go to Amazon and search for the exact phrase to see if there is someone else who has already created designs with this phrase / theme.

You want to save yourself time and money and not create something that exists already.

EXAMPLE: From the options that I selected I did a quick search on the following phrase ‘My Idea of Group Therapy Shirt’ and found that 24 designs already exist for this phrase and none of them are selling particularly well, so there’s no point in going for this one:

Group Therapy Search Results

Check for Trademarks

The next thing you want to do is to a quick check of the phrases on your shortlist of designs in case there are any trademarks.

I always put the terms and variants into http://tmhunt.com . We’ll do another Trademark search later on but it’s worth checking your main phrases at this stage.

Finalise Your Ideas

Now we need to take these basic ideas that we have and turn them into actionable pieces that a designer can create a design from.

This next phase is probably the most difficult phase and is something that is difficult to teach and is more of a skill that you acquire after creating numerous Tshirt designs.

However, there are some pointers that may help you:

  • Keep Phrases short and sweet so they can be seen from a thumbnail
  • If you are creating a text based design try to interlace the text with assets related to the niche. For example, swap out some of the letters with iconography from the niche or add a flourish that includes a niche related graphic.
  • Don’t overcomplicate the design … try to base it on one simple concept that is instantly recognizable
  • Think about the font that you want on the design. Some niches will naturally have a certain style and fonts that work eg Gothic, sports, kids niches all have different fonts that would work well for them
  • Think about the person buying the design and the message they would like to portray by wearing your Tshirt on their chest

Submitting Your Design Brief

If you create your designs yourself then you don’t need to worry about this stage too much, but a lot of you will need to outsource work to designers (especially if you wish to scale your business) so creating a clear brief is a very important step and will save you time in the long run with less revisions the clearer you are up front.

Some tips from me to creating your brief:

  • Use plain/simple English to explain your concept as often your designer will not be a native English speaker
  • Provide examples of styles that you like – give as many screenshots and references to other pieces of work / Tshirt designs that you have seen and be clear what you like/dislike about them
  • Ask for a couple of options. It’s always going to be difficult for a designer to get the brief right every time so give them a couple of ideas to try out
  • Be prescriptive and clear about what you want. If you want them to create a design with a car then tell them what kind of car you want, what colour and which angle the car should be at

EXAMPLE: From the research we did previously I have created 4 final ideas that I will send to my designer in the next step, which you can view here

Design Pickle

Design Pickle Submit a Design
Design Pickle – Submit a Design Form

In the video you see that I am using a service called Design Pickle. This is a paid service that you can pay for on a monthly basis.

The general idea is that you can submit as many designs and revisions as your designer can get through in the time that they have allocated to them…. another good reason to make sure you have clear briefs!!!

You will be allocated a designer who will stay on your account, which is a great thing because after a while they really get to understand what you like stlyewise.

Typically a designer will get through 2 design briefs a day, which will include 2 – 3 variations and the revisions that you submit. However, if you ask them to create a really complex design then this will a bit longer!

For me the massive benefit for using Design Pickle is that this also gives you access to Getty Images for use on your Tshirts with a commercial use license, which only costs you $25 a month….. that’s a bargain in anyone’s books!!!

Design Pickle Pricing Plans

I bought an annual plan so it works out even cheaper than this but even for $370 a month you can break this down as follows:

  • 21.62 = average number of working days per month
  • 4 Unique Designs per day minimum (2 design requests with 2 variations)
  • 83 Unique designs per month
  • $4.45 Cost per design (370/83)

Upwork

Another good source for finding a designer is upwork.com where there are plenty of good designers available.

Simply add a job description and a price per design and you should get a number of replies back.

I posted the following job for $5 per design and managed to find 3 designers out of this:

I’m looking for a designer to work with me to build up my stock of designs for various print on demand services.

Will pay $5 per Tshirt
You must supply all layered files
You must own the rights to all fonts and imagery used
Designs must be unique for my use only

Please send examples of your work and you must be willing to submit a test design based on my criteria I submit.

Likely to be a longer term engagement for successful candidates

The main thing is that you will need to spend time going through the different applications until you can find a decent designer.

The downside to using Upwork however, is that your designers won’t have access to a lot of the source assets that you can get from Design Pickle and it’s harder to know that the designs they are creating for you are unique.

Step 4 – Writing your Product Listings

I’ve now got the finalised designs back from my designer and am ready to move ahead and create my product listing by performing keyword research and creating a product that stands out to potential customers.

This step is another extremely important step, because if you don’t write your listings correctly, no one is going to find your beautiful designs, which means less money in your piggy bank!!!

2 schools of thought…

There are lots of different schools of thought about the best way to write a product listing so that Amazon’s search algorithm will rank your product as highly as possible.

Some people are very minimalist with their keyword approach and will choose only a couple of keywords which they repeat in the title and bullet points. Their idea is that the fewer keywords you use, the more targetted the listings will be and the more search weight Amazon will give to the individual keywords you are targetting.

Other people try to cast their net as wide as possible and sneak in as many relevant keywords into their listings as they can, without making the listing look like it is spammy or untrustworthy.

Personally I lean towards the second approach slightly more but see which approach works best for you and most importantly, try out both approaches on different listings.

Anyway, I’ve found an approach that works for me and now have a series of repeatable steps that I go through as I build up my product listings:

Keyword Harvesting

The first thing that I do is open up a notepad file and start collecting as many relevant keywords that I can find that are related to the main keyword I am looking for.

The main thing to note here is the word ‘relevant’ because for each keyword you add, you need to think whether someone who uses that keyword in their search term would actually want to buy the T-Shirt that you are selling.

To help me create my list of keywords I use 3 sources:

  • Google
  • relatedwords.org
  • merchinformer.com

Google

Traditional Archery Google Search Results

Take your seed keyword eg ‘Traditional Archery’ and search for this in Google. Usually I just spend a couple of minutes scanning the page to pick out some of the main related keywords.

As you can see from the screenshot, the google snippet on the right is usually full of relevant keywords, but it’s also worth clicking into a few of the top results to see what you else you can find.

Relatedwords.org

Relatedwords.org Search Results

The relatedwords.org website is pretty much an online Thesaurus that allows you to enter search terms and will bring back a range of associated terms.

The results are a bit hit and miss, however, you will often find keywords in this list that you won’t come across in other searches.

Merch Informer – Product Search

Next you should hop on over to merchinformer.com and click on the ‘Product Search’ tab.

Enter your seed keyword and select ‘Search in title only’ and you’ll see a set of results like this:

Merchinformer - Keywords
Merchinformer – Keywords

What this shows us is a list of the most common keywords that people have used in their listings that are returned based on your seed keyword. Scan through this list and pick out keywords that you think will be relevant to your listings.

It’s also worth reading through the bullets and descriptions of some of the top selling shirts in the niche as well to give you some more ideas for writing your own listing later.

EXAMPLE: At the end of this process I now created the following list of keywords that I can use in my listing:

archers, archery, bowman, hunter, oldschool, oldfashioned, toxophilite, bowhunting, arrows, bullseye, target, longbow, recurve, simple, bow, hunting, sport, gift, practice, range

Writing your Listing

Now that you have all of your keywords prepared you just need to add these into a coherent product listing.

I keep all of my product listings in an excel sheet, which could become more difficult to manage over time, however, is my preferred tool at the moment.

I’ve created a file with some simple formulas to help you speed up the product listing process which you can download below:

Listings-Creation-WizardDownload

To use this file simply fill in the following fields:

  • T-Shirt Text – Any text you’ve used on the actual shirt
  • Keyword – Your main keyword
  • Person – Who you think would buy the shirt
  • Where – Where the person is likely to wear this shirt
  • Brand – Use the main keyword and 1 or 2 related keywords
  • Title – Use the main keyword + “Gift” for the person who is buying the shirt
  • Bullets 1 / 2 – The file will generate most of the sentence for you, but you should insert extra keywords from your list into these slots to make them read as clearly and as naturally as possible.

EXAMPLE:  From the Traditional Archery designs I now have listings ready to add into Merch by Amazon that look like this:

Brand – Traditional Archery Bows and Arrows Tees
Title – Traditional Archery T-Shirt : Gift for Archers, Hunters and Bowman
Bullet 1 – This cool Traditional Archery T-Shirt is a great gift for an Archer or Bowman to wear to the Range and will look great when you are shooting a few arrows at the bullseye target with your favorite bow!
Bullet 2 – This cool tee features an image of a damaged arrow and a cool, vintage font saying “It’s just a fletch wound”, which every oldschool toxophilite bowman will be proud to wear to the next bowhunting competition.
Description – This cool Traditional Archery T-Shirt is a great gift for an Archer or Bowman to wear to the Range and will look great when you are shooting a few arrows at the bullseye target with your favorite bow!
This cool tee features an image of a damaged arrow and a cool, vintage font saying It’s just a fletch wound which every oldschool toxophilite bowman will be proud to wear to the next bowhunting competition.
This cool and fun Tshirt is sure to make your family, friends or colleagues smile from ear to ear! No longer be stuck searching for a souvenir birthday present for your Girlfriend, Boyfriend, Mum, Dad, Son and Daughter with this unique gift!
The best gifts are both personal and functional, and that is why this Humorous Tee is a fantastic choice.

To be honest the description is a bit over the top but it’s not used as part of the Amazon search algorithm. The main purpose of the description is to help with Google search, and also to give buyers confidence in your listing.

Step 5 – Uploading to Merch

OK, so the good news is that we’ve done most of the hard work now, or at least the majority of the work that involves thinking.

This next phase is the monotonous process of uploading your finished designs and listings into Merch, so I suggest you go and get some decent toooones to listen to as you hammer through the upload process.

To help us with the upload process there are a couple of tools that will speed things along a little.

Colour Profiles

Choosing the colour that you want to upload your Tshirt for and whether the shirt is for men, women and youth sizes can become a bit irritating if you have to do this repeatedly, but luckily there are a couple of extensions that you can get which condenses this process into the click of one button:

Merchlister Pro

This is a neat Chrome Extension that you can download from here for a cost of about £6/$10 per month.

This extension becomes really useful if you have lots of designs in a similar niche with similar listings, so rather than copy/pasting everything you can just press one hotkey and it will populate the listing for you.

One of the other features is the color selector tool as shown below, which allows you to select the colors you want for your designs and set these up with one click.

Merchinformer Lister

This extension comes free with the merchinformer.com subscription and does a lot of the same things that Merchlister Pro does:

Upload in Bulk

To make the most of my time I make sure that I always do a big batch of uploads rather than doing them one at a time.

I find it easiest to open up 10 tabs at a time then copy/paste my title, bullets and descriptions from the spreadsheet we prepared earlier. You’ll be suprised how quickly you can do this after a bit of practice.

Final Check for Trademarks

The final step before pushing your listing live is to check whether any trademarks have slipped into your listings and again this is another great tool that merchinformer.com gives you:

Merchinformer Trademark Search

This shows you any words / phrases within your listing that are currently trademarked and if you click on the words, it will take you through to a page with more details on the trademarks and links through to the USPTO website

Step 6 – Setting up Your AMS Advertising Campaigns

So you thought you’d done all the hard work and could kick back and relax now that you’d uploaded your designs to Merch… well you’re wrong.

Even though you have well researched, well designed ideas, you want to make sure you give your shirts a bit of a foot up and help them to get the BSR as soon as possible to give them the maximum chance of selling on multiple occassions.

This step is completely optional and is something that you should only do if you have a little bit of extra cash to spare, because you can easily burn a lot of money if you haven’t properly optimised your ads.

If you haven’t signed up for AMS yet, then look on the bottom of your dashboard and you should see this kind of message, with a code and instructions on how to set up your account.

The AMS Dashboard

If you do have an account then when you login you should see something like this:

AMS Amazon Advertising Dashboard

This dashboard gives you a snap shot of you total account statistics over a certain date range as well as stats for your individual campaigns, including:

  • Spend – Total amount you have spent on the ads
  • Impressions – the number of times that you ad has been shown when someone performed a search
  • ACOS (Advertising Cost of Sales) – This is the most important figure which basically shows your advertising spend to sale ratio. You want this figure to be as low as possible and ideally under 10%. Anything over 20% realistically means you won’t be making much profit if any even if you are selling shirts.
  • CPC (Cost Per Click) – This shows the average amount you are charged each time someone clicks on your ad

Creating a Sponsored Product Campaign

Setting up a campaign is really simple, you’ll want to click on ‘Create Campaign’ then select ‘Sponsored Product’ and you’ll see this interface:

Creating a Sponsored Product Campaign

You’ll want to add the following:

Campaign Name – Make this something that will be easy for you to search for and identify because you could have hundreds of these campaigns running in the future… I just use the file name

Daily Budget – I always set this to $3 but this rarely gets reached

Targeting – You should always start this on automatic and it will show your product ad based on searches related to your keywords in the title and bullets of your listing. After time you can then goto the Advertising Reports section to see which keywords are most successful in selling your shirt, and can go back to change the campaign type to manual

You’ll then need to search for your shirt(s) and add this to the listing. I usually only add one shirt per ad that I am running, or if I have 2 variations of the same shirt, sometimes I will group these together…. just because it’s easier to review reports later on if you have these ads separated out.

Bid – Set this to ‘Dynamic Bids – Down Only’ and unless you have huge amounts of cash to risk then I’d typically only set your bid at between $0.15 and $0.35

Monitor Your Campaigns

The most important thing to do once you’ve set your campaign up is to make sure that you go back and review its performance a week later and then continually monitor your ads.

You need to make sure that you switch off underperforming ads and invest more in ads that are performing well.

I’m still new to AMS and it is a whole new thing to learn, review and tweak your strategy on, but in my opinion you should definitely utilise this where possible to help your shirts to get BSRs and ultimately to grow your account.

Step 7 – Going Multipod with Orbitkit

OK, so this is the final step, I really, really promise you!!!

Lets say you’re at T500 and you have 1000 designs locked and loaded and ready to go, well it can be quite frustrating that you’ve got nowhere to upload those designs to because of the Tier limit that Merch imposes.

The good news is that there is actually life after Merch and in fact there are tens of other Print on Demand Platforms that you can use (mostly for free) to market your designs.

The bad news is that uploading your designs individually to each new platform is a major pain in the ass and drain on your time. Additionally, these other platforms won’t have the same amount of traffic as Amazon does, so it’s going to be hard to get much money out of the input you put into it.

Really depressing eh????

Well, no actually, because there is some more GOOD NEWS and a service designed with this particular product in mind called Orbitkit

What is Orbitkit?

Orbitkit is basically a great piece of software that allows you to upload your Merch by Amazon 4500 x 5400 px png files into a central location, which will then publish this onto multiple print on demand platforms at the click of a button including:

  • Redbubble
  • Spreadshirt North America
  • Spreadshirt Europe
  • Zazzle
  • CafePress
  • Society6
  • Inktale
  • Fine Art America
  • Teespring

It sounds like the Orbitkit team plan to keep adding to the list of integrations as well so this list should just expand over time.

How Does Orbitkit Work?

Orbitkit Design Interface

Simply upload your designs into Orbitkit and for each design you’ll need to add:

  • Title
  • Description
  • Tags

You will have all of these items from spreadsheet we created earlier with you Merch designs so you just copy these over onto your Orbitkit listing.

Creating Blueprints

For each POD Platform that you register for, you will need to create a blueprint to use with Orbitkit

This sounds a lot more complicated than it actually is, but all you are doing is adding a sample design into the POD Platform and configuring it for all the different products you want to sell.

You only do this activity once, because it is then imported into Orbitkit and when you upload a new design you can select which Blueprints you want to publish your design to.

As you can see from my dashboard below this means that you can publish you designs at the click of a button to multiple PODS without too much hassle and means that you now have your designs on thousands of different products from yoga mats, to mugs, leggings, wall hangings and even fine canvas art!

My Orbitkit Dashboard

What Does Orbitkit Cost?

The GREAT NEWS is that if you sign up using this link then you’ll get the first month for only $5 which is a MASSIVE BARGAIN!!!

There are now a couple of pricing plans available for Orbitkit which you can see in the screenshot below:

Orbitkit Pricing
Orbitkit Pricing

Whilst it isn’t the cheapest kit in the world, I think it is still a good investment for your Print on Demand Portfolio as it means you are exposing your designs in as many marketplaces as possible.

If we do the maths, then for a 2 month subscription at a cost of $190 you will be able to upload 1200 designs to 9 different platforms, and then if you like you can terminate you subscription until you have the next batch of designs ready.

Personally I think it’s a no-brainer because you will make that money back in sales over the duration of a few months anyway. The other options are to do this yourself (in which case your brain would be so frozen over with boredom that you’d want to rethink your whole life) or you’d have to hire a VA to do this (which would cost more money and impose an existential crisis for your VA instead).

Step 8 – Drink a Large Glass of Wine

There’s probably more things that you could be doing after this, but if you’ve managed to get this far and if you are actually still reading then I salute you, and you really should go and pour yourself a large glass of wine or whatever your favourite tipple might be right now.

Just to say that this is my process only and there are definitely better ways to do things and things that I’m probably doing wrong as well.

However, for me, especially when I started Merch the amount of information out there was overwhelming and I just got distracted every time I tried to do something, so having a repeatable process to follow was essential to me and has really helped me grow my account.

Have Your Say

If you have any tips on how I can improve this process, things you would do differently, mistakes you’ve made and how you’ve learned from them then I’d love to hear your feedback in the comments below…

Filed Under: Print on Demand Tagged With: merch by amazon, print on demand

Q4 is Here and my Sales are Rocketing!!!

4th December 2018 By martinos74 Leave a Comment

Q4 Merch by Amazon

Black Friday came with a bit of a bang and the fallout from that is that my sales have really started to kick in for Merch by Amazon.

I’ve got nearly 1000 designs live now and on Black Friday I managed to pass the barrier of selling 10 shirts in a single day. Might not sound like a lot but to me it’s great progress as I’ve only been doing this for a few months and it shows that this really can work if you put the time and effort into it.

I’d been hovering around 5-8 sales for a few days, so the Black Friday bump really helped me, but even better is that sales have not stopped since then and I’ve been consistently selling around 10 shirts for the past week or so.

Christmas Strategy

Previously my strategy has been to price low to get a sale and ensure that I get a BSR (Best Sellers Rank) on my product before rising the price, but I’ve figured with Christmas price is less of a factor and if people really like your design then they’re going to pay a few extra bucks for them.

With this in mind I’ve pushed my starting price up to $16.99 per shirt to get a bigger royalty and the sales haven’t slowed down.

AMS Ads (Amazon Marketing Services)

Another reason for increasing my prices is that recently I have been given access to AMS, which allows me to advertise my shirts. I’ll do a full article on this at some point later, but the basic principle is that for each T shirt or group of T Shirts, you can place a bid so that it shows higher up the page for keywords related to your shirt. Higher up the page = more sales.

One thing I learned fairly quickly is that you can burn a lot of cash on this quickly if you’re not very careful and my Acos (Average Cost of Sale) was running at about 50% to start with, and ideally this needs to be down around 5%.

After a bit of tinkering and lowering my default bid to 0.15c per click, I’ve started to get this down to about 7% which is not so bad.

Etsy Printful Integration

I went a bit crazy last month with my Etsy account and added 1200 designs for mugs and shirts, so I’m going to need to sell a load of products this Q4 in order to get that investment back. I think it’s going to be difficult to break even on it, but my strategy is to see what works this year, and build up the credentials for my store. As soon as I get better reviews I can then focus on the smaller set of products that I sell (probably my best sellers from Amazon) and can embelish my listings with better mock ups and descriptions.

Currently I’m selling 2 – 3 products a day on Etsy so things are ticking along.

Amazon / Gearbubble Integration

The other thing that is finally starting to pick up after months of next to nothing is my sellers central account and the integration with my Gearbubble products (mugs and travel mugs mainly)

I’m selling 2 – 3 products a day at the moment and have just managed to get the Buy Box on all of my products. This means that I can now use AMS advertising for these mugs!!!

Orbitkit Multipod

The final thing worth mentioning is my progress with Orbitkit which is a platform that automatically uploads your designs to multiple Print on Demand Partners.

Whilst it’s not a massive earner, I’ve got most of my 1000 designs up on these platforms now, so they should fairly passively trickle in some income over the next year.

So far, I have the following running totals:

  • Zazzle.com – $34.36
  • Spreadshirt.com – $42
  • Spreadshirt.co.uk – $40
  • Teespring.com – $0
  • Cafepress – $25.69
  • inktale.com – $0
  • fineartamerica.com – $5
  • redbubble.com – $8
  • society6.com – $0

So Q4 is definitely kicking in and the sales are starting to grow. I just wish it was like this all year round…

Filed Under: Print on Demand Tagged With: Amazon Marketing Services, ams, merch by amazon

Tier 1000 – The Ship is Starting to Sail!!!

10th November 2018 By martinos74 Leave a Comment

Merch by Amazon Tier 1000

Well, what a funny day that was the other day and pretty much sums up life in online business.

First of all I get my Redbubble account closed, for no clear reason, then I get a rejection from Amazon because I changed the pirce on one of my shirts and it was not longer deemed acceptable for youth, then….. I get tiered up to Tier 1000!!!

Benefits of Tier 1000

The reason I’m really excited about this is that it has got me out of the lower tiers and I now have a lot more slots that I can play around with. This means I can try more batch / scaled designs eg ‘Best Mom in [US STATE]’, I can also try my designs on some of the other products such as hoodies and popsockets and generally I don’t have to worry about not having enough slots any more.

This was becoming a bit of an issue as I quickly filled my 500 slots previously and have a designer regularly creating designs for me withouth having anywhere to put them.

The other thing for me is this is a bit of a mental shift, where I’ve got out of the Merch by Amazon Kindergarten phase of the lower tiers, and now am probably in the equivalent of first grade elementary school.

How did I get to Tier 1000?

Until recently you needed to sell 100 shirts to get out of T100, 500 to get out of T500 etc etc, but this has changed and I was tiered up with just over 200 total sales.

The other important factor to helo you get tiered up is making sure that you have maxed out your slots as soon as possible. I think it even helps if you start saving your items to drafts as soon as you have filled you slots up, because it shows Amazon you have plenty more designs that you want to sell.

How did I fill my Tier 500 Slots?

Anyone who is familiar with Print on Demand knows that researching, creating and uploading designs that are unique and not scaled is quite a long process and involves:

  1. Design Research
  2. Design Creation
  3. Researching keywords, bullets and descriptions
  4. Design Uploading

Out of these for items anyone of the first 3 items can be outsourced, which I’d highly recommend you do unless you have bags of time.

Which one of these you should outsource depends completely on your skillset and what you like doing.

Personally, I like to do all my niche research and creation of keywords myself, not because I particularly like doing it, but because I find this harder to outsource and find good candidates to work on this rather than anything else.

At the moment unfortunately #4 is not possible to outsource and if you did, you would probably lose your Amazon account, so for me the obvious candidate was outsourcing the design work.

Even though I like to do some of the designs myself using Photoshop and the really cool Merch Informer Design Tool, I found I was sinking hours of time into this, that I could have spent elsewhere.

I’ve tried 2 different routes to find designers:

Upwork

I’ve used Upwork before to find Virtual Assistants and it’s just as easy to find designers.

An example of my job post that I put out is below:

Merch By Amazon Tshirt Designer Wanted 

I’m looking for a designer to work with me to build up my stock of designs for various print on demand services.

Will pay $5 per Tshirt
You must supply all layered files
You must own the rights to all fonts and imagery used
Designs must be unique for my use only

Please send examples of your work and you must be willing to submit a test design based on my criteria I submit.

Likely to be a longer term engagement for successful candidates

After this I received over 20 recipients then gave about 8 of them a test design brief to create. From this I then found 3 designers that I used consitently for the first few months and their designs were pretty good.

Design Pickle

One of the issues that I found with the Upwork designers was that they were limited by the stock vectors that they could use so a lot of their designs looked similar to what other people were producing on the market, so you had no competitive edge.

I also found that there would be periods of time where I hadn’t researched things for them, which slowed down the overall production and meant I was creating as many designs as I wanted to.

It was only when I spoke to someone at a UK Merch Meet Up that I found out about a service called Design Pickle. The idea with this service is that you basically hire a designer for a month, or however long you can afford, and they create as many designs as they can get through each week for you. There’s a simple process where you submit a brief to them, with examples of the kind of design you want and as much info as you can give them about the design, and they will crack through their list one by one, with as many revisions as you like.

Design Pickle Design Submission Form

I wouldn’t usually go for something like this, but as this girl at the meetup mentioned, this is a great way to fill up your slots quickly and it keeps you motivated to keep researching and coming up with designs each day. The next day after speaking to her I looked on the Design Pickle site and they had 35% off of annual memberships and I of course can not resist a bargain so signed up for a year… This set me back a little over $2000 but I think it’s been worth every penny so far.

Getty Images Integration

The other huge benefit with this service, and I mean HUGEEEE, is that for an extra fee of $25 a month you get full commercial rights to images and vectors from their image library. You can either choose the images yourself when you brief your designer or you can let the designer choose the images for you. That’s a pretty crazy deal when you think about it, because most licenses for commercial use are going to cost you over $25 for a single image!!!

Luckily I’ve got a great designer and I’ve got into a good rhythm with him where he understands what I want pretty quickly and hits the mark on about 90% of my designs without the need for revisions.

The other good thing about this is that it forces you to create design ideas, because if you are a stingy bastard like me, then you want to get your money’s worth from this service. If you don’t give your designer any briefs then he just won’t be working and you will be wasting your money.

On average my designer will create 2 sets of designs for me each day. For each design set he’ll usually provide me with a couple of options, so I’m getting a minimum of 4 designs a day from him.

If you’re really stingy (or clever depending on how you look at it), and have a few design skills then you’ll ask your designer to create you templates that you can then use to mass produce some scaled designs yourself. This is what I have done on a number of designs and have meant that I can quickly build up my design library.

So, there you have it… if you want a quick way to create high quality designs and have a few bucks to spend then I can’t recommend these guys highly enough:

Design Pickle Promotion

Filed Under: Print on Demand

Diversifying into Etsy with the Printful Integration

31st October 2018 By martinos74 Leave a Comment

Etsy

As an enthusiastic Mercher, one of the (good) problems that I’ve faced, is having too many ideas and designs for the Tier that I was on. I managed to fairly rapidly work my way up to Tier 500, but found that I had filled most of those slots fairly rapidly so with time on my hands and Q4 calling me, the next thing to look at was Etsy.

I’d already had an Etsy store set up and had experience selling coffee mugs last year using the Low Hanging System, so I thought this is seemed like a good marketplace for trying my Merch by Amazon designs as well.

What is Etsy?

For anyone who doesn’t know about Etsy yet, it’s basically another marketplace where you can list a variety of products. Similar to eBay in a way, but the general idea is that products are more hand-crafted and bespoke, rather than products for resale only.

In fact, in order for me to get accepted originally I had to take screenshots of my design process, to prove that I was an actual designer. Etsy are a little bit sensitive if you are not creating the designs yourself and use an external manufacturer like we do for print on demand, so you need to be a bit careful.

Once you get accepted though, the listing process is really simple and Etsy charges 20 cents per listing, which stays up for 3 months.

Etsy / Printful Integration

One problem I had last year with Etsy, was I used Gearbubble as my suppliers for my coffee mugs, but they had no direct integration with Etsy, which meant every time a product sold, I had to go into Gearbubble and place the order manually which was a bit of a pain.

Luckily, for Tshirts, I found another provider called Printful who offer a wide range or products, not only shirts, and integrate directly with Etsy. It’s a pretty awesome service, with a really smooth interface, is dead easy to use and has a pretty decent range of products. I’ll do a detailed review in a separate article on this at some point but the key benefits for me were:

  • Easy to set up the integration with Etsy and Amazon
  • Price of Tshirts are competitive $8.95
  • Shipping pricing and times are really competitive and they distribute from local European printers as well

The other main advantage here was that I could get my Virtual Assistant to upload my products into Printful and with a click of a button they’d be pushed to Etsy, meaning my VA never needs to login to my Etsy account and potentially get it banned.

Printful Integration Promo

Etsy Rank

I also stumbled across a tool called Etsyrank which has a really powerful free version that you can use to find keywords for the title and tags of your listings. I watched the following video which shows you basically just copying the top 10 keywords across into Etsy, which makes the entire process really quick :

If feels a little bit like keyword stuffing but it seems to work.

Paid Ads

At the point of writing I still hadn’t been given access to AMS for my Merch listings, however, with Etsy, you get instant access to their promoted listings feature straight away.

Again, there’s a simple interface for you to switch on their promoted listings and you can set a daily budget and a maximum cost per click that you’d like to pay. You can then apply this to all of your listings customise each of your bids on individual listings.

Etsy Ads

To be  honest I had mixed results with this, starting off really well getting me a sale a day but then after time the sales dripped off a little and I think overall I ended up paying out more in ad spend than I gained in profits from my sales. However, on the positive side, it did mean that my store was getting a bit more momentum and I’m sure that having more sales and reviews in your account will boost your listings overall.

Customer Service

One thing to point out with Etsy, is that generally the customers who shop there are a bit of a pain in the ass and can be quite demanding. To succeed on Etsy you need first rate customer service and the customer knows this, so be prepared for people with crazy demands… Luckily after my eBay dropshipping experience my customer service had to improve a lot so hopefully this is something I can apply to Etsy as well.

Progress

I’ve managed to get about 350 of my designs up on Etsy already, and want to get the rest up as soon as possible given that Q4 is now upon us.

I haven’t seen a huge amount of sales yet, and the jury is still out on this one, but hopefully Santa will give us a good Q4!

Filed Under: Print on Demand Tagged With: etsy

« Previous Page
Next Page »

Martinos Digital Ltd - Dyne Road, London, England