Choosing a niche for your online business can seem complicated, however, this guide will show you how to find a niche market right for you.
In this guide I’m going to give you the tips and the tools that you need to select your niche in less than a day!
Quick NavigationStage 1 – Creating a Shortlist of NichesStage 2 – Find a Niche Product Using Amazon SearchStep 3 – Find the Best Keywords for Your Niche Using Keyword ModifiersStep 4 – Sample Your Keywords for Keyword CompetitivenessSTEP 5 – Analyse the CompetitionStep 6 – How to Choose a Niche Market?SummaryTools Used
Stage 1 – Creating a Shortlist of Niches
Task Time : 1 Hour
If you’re looking to make money online, then finding potential online business ideas and understanding how to find a good niche are critical to your success. There are so many potential niches out there for you to choose from and getting started is going to be your biggest barrier.
My main advice to you is start with something that you’re interested in. After all you’re going to spend a lot of time researching, writing and being part of that niche community so it’s best that you are in some way interested in the subject.
Some of the most profitable niches are going to be hobby or passion niche’s where people are emotionally attached with the product so are a lot more willing to spend money, and therefore advertisers will be a lot more willing to pay for space on your site!
I had a number of ideas for niches that I was thinking of entering but wanted to broaden my reach a bit before entering into keyword research so I started with our good old friend Wikipedia. They have a really useful list of hobbies page, which lists pretty much every hobby you can think of.
My process was to simply run through this list and make a shortlist of niches that I was interested in. This took me about an hour to do but was a really useful brainstorming exercise as well as it generated a lot of potential online business ideas.
Once you’ve created a list of potential niches that you’d like to set up a business in you want to see what kind of keywords are available for that niche so you can interrogate them and see if there really is a business there.
In general we can split the keywords into 2 distinct groups:
- Product Keywords – These will be useful for your website monetization strategy
- Information Keywords – These will be useful to drive traffic to your website
Both sets of keywords are equally as important as they can bring revenue and traffic to your site.
Stage 2 – Find a Niche Product Using Amazon Search
Task Time : 10 Minutes per niche
If you’re going to make any money online you need to know how to find a niche product or a service to either sell or recommend. Without products in your niche, your bank account is going to remain very empty.
For each of the niches on you shortlist, spend 5 minutes brainstorming some products that are related to that niche. For example, if you’re really into walking then your first list of product keywords would be something like
- Hiking boots
- Hiking poles
- Backpacks
- Fleeces
Once you’ve got a small set of keywords together then I’d simply jump on over to Amazon.com and type these keywords into the search bar:

How to find a niche product using Amazon auto suggest
What you’ll find is that the auto-suggest kicks in and shows you a load of other related product keywords that you might not have thought about before.
In the case above we can now add the following keywords to our list:
- Hiking socks
- Hiking armband
- Hiking trousers
- Hiking gaiters
I also recommend clicking around the categories as well and you’ll probably find another few related products that you could add to your list.
Step 3 – Find the Best Keywords for Your Niche Using Keyword Modifiers
Task Time : 10 Minutes Per Niche
The next trick that we are going to use is a combination of keyword ‘modifiers’ and a free tool atUbersuggest.org to help you find profitable niche keywords.
Keyword modifiers are simply additional words that you put either before or after your keyword to help you find keywords in your niche with a stronger buying intent.
Examples of these are
- Best eg ‘Best hiking boots’ or ‘best hiking boots for’
- Reviews eg ‘hiking boot reviews’
- Top eg ‘Top hiking boots’
- where to buy eg ‘where to buy hiking boots’
- versus eg ‘hiking boots vs sports shoes’
- brand names eg ‘North Face hiking boots’
You can find a full list of these types of modifiers here
You should then take some of these sample keywords that you think will work and plug them in to the free ubersuggest tool. Ubersuggest basically uses Google’s autocomplete function and goes through every letter of the alphabet trying to find related search terms.
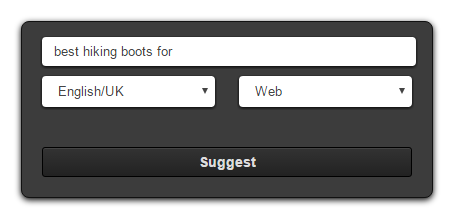
Ubersuggest Search Box
This won’t work in all cases but if you put open ended strings into the search box, then you’ll get better results back eg ‘best hiking boots for’ or ‘where to buy hiking boots for’ will bring you back much better results than ‘North Face hiking boots’:

Ubersuggest provides a list of related keywords
All you need to do next is to click on the ‘Select All keywords’ button and copy the keywords that you’ve created into a master list of keywords for that niche. I usually keep these in a spreadsheet, which has a tab for each of my niches like this one: How-to-Choose-a-Niche-Workbook
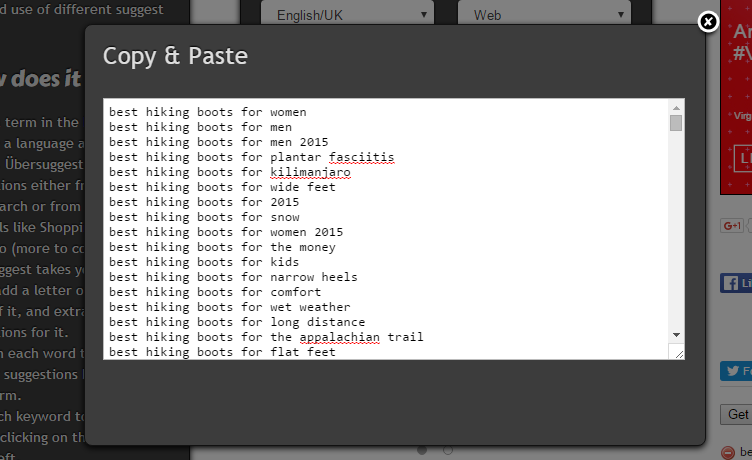
Ubersuggest Keyword Suggestions
Step 4 – Sample Your Keywords for Keyword Competitiveness
Task Time : 20 Minutes Per Niche
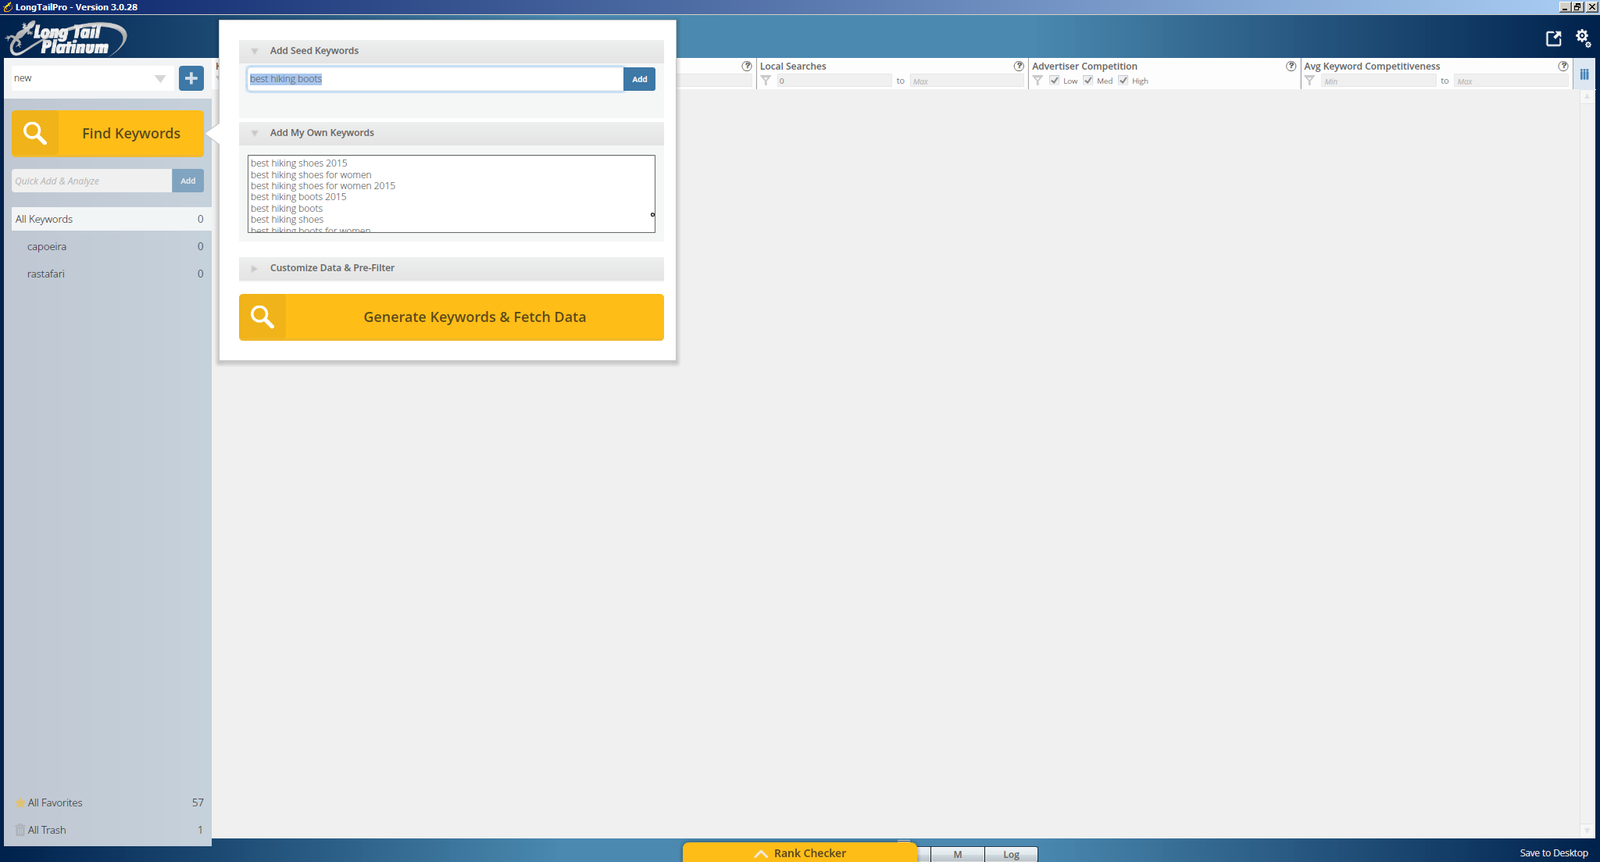
When you’ve gone through this process a few times in Ubersuggest, copy all of your keywords and add them into Long Tail Pro. Add one of your main keywords like ‘best hiking boots’ as your seed keyword and add all the other entries into the ‘Add My Own Keywords’ section then just click the ‘Generate Keywords’ button and sit back and relax for a bit:
how to choose a keyword for website
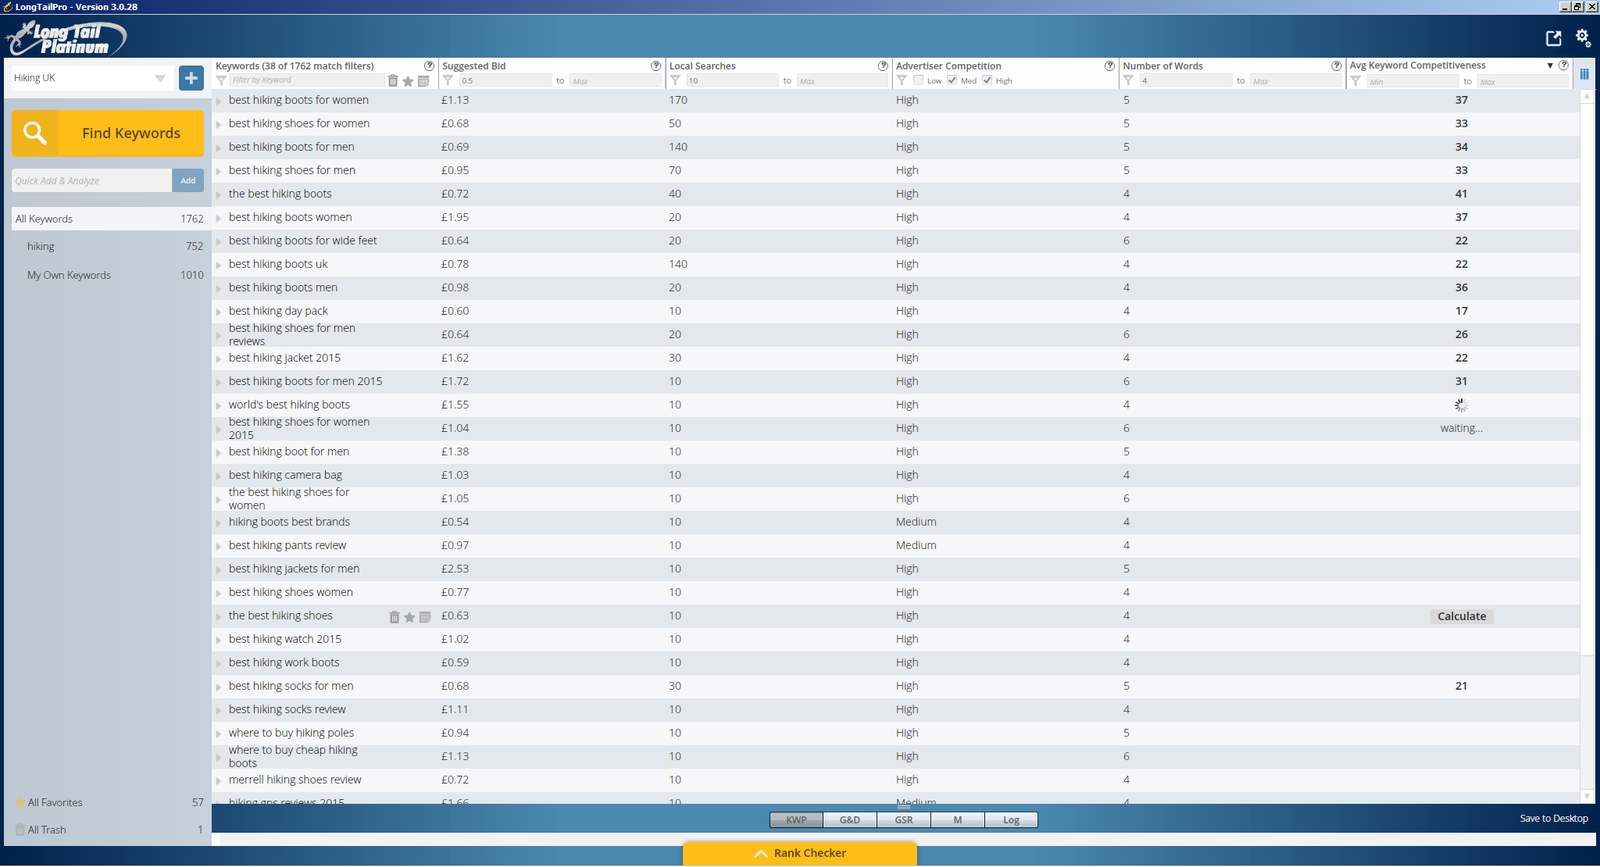
You’ll then be returned with a huge number of results from Long Tail Pro but to help you filter this list I would recommend the setting the following filters in Long Tail Pro
- Suggested bid : £0.50
- Local Searches : 10
- Advertiser Competition : Set to Medium/High
- Number of words : 4
Once you’ve done this then you’ll have a much smaller list that you can go through and check out the Keyword Competitiveness scores. Usually I’ll try this across a range of keywords, starting with the higher value and higher traffic keywords but sampling all the way down to keywords that have low CPCs and low traffic.
In the process that I went through I tried to sample about 50 keywords for each niche, which really gives you a good idea of how competitive the niche is. If there are hardly any keywords with a KC of under 30, then it’s going to be really hard for you to enter that niche, so probably best to move on to the next one in your list.
Here’s a real example of hiking boots that I looked at:
what are the best keywords for my website
For each of your niches when you find a good keyword then add this to your favourites, which will help you when you come back to review them later on.
STEP 5 – Analyse the Competition
Task Time : 10 Minutes Per Niche
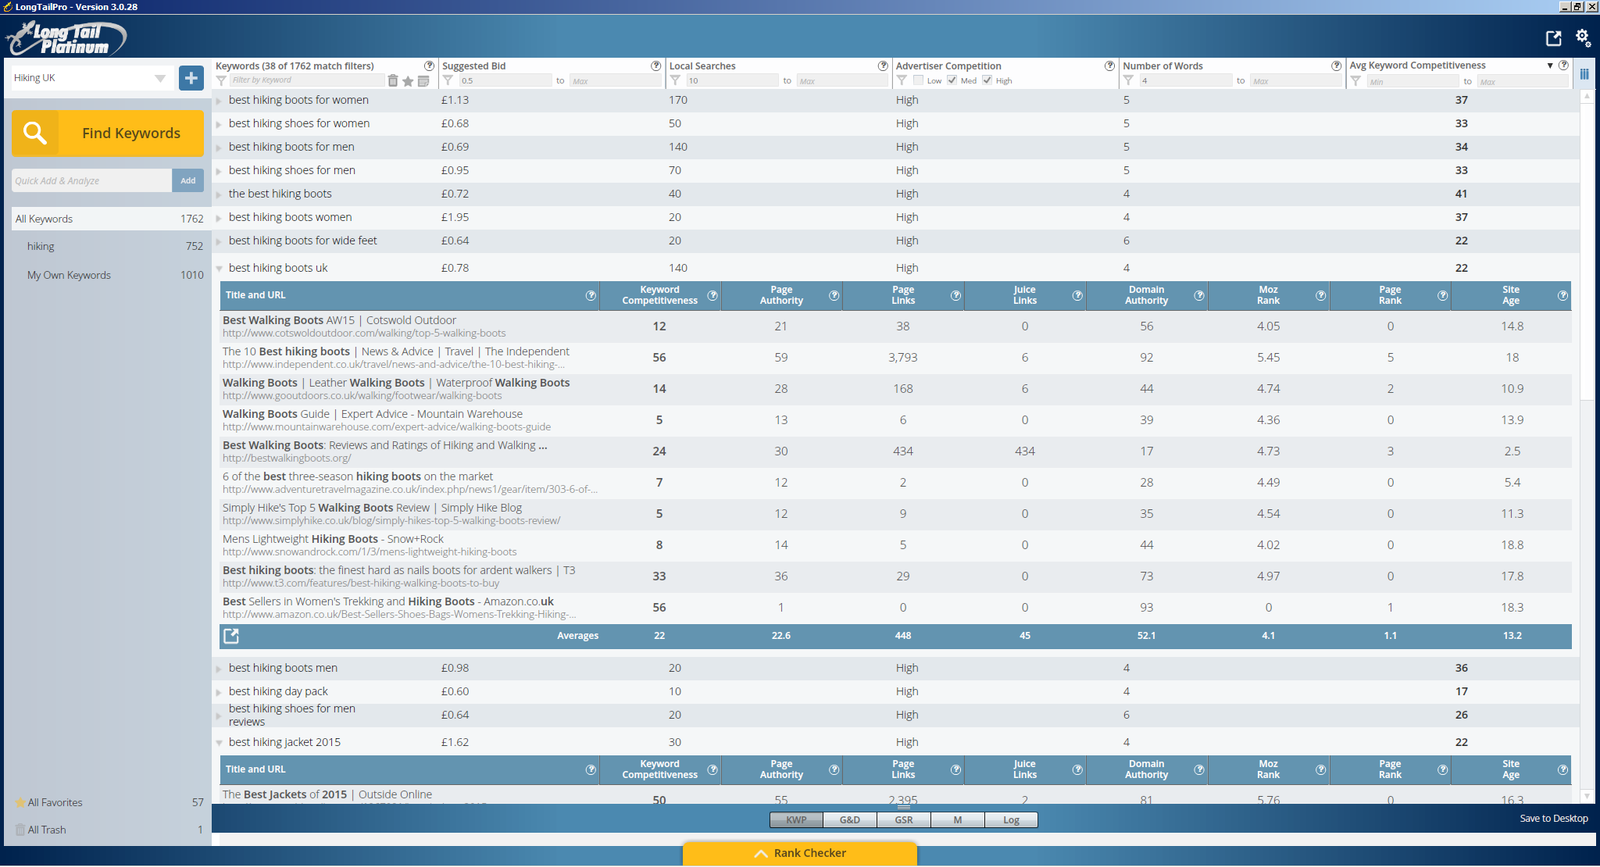
The next thing to do is to analyse some of the keywords in that niche, to see if you are going to be able to push your way onto that elusive first page of Google. You want to start by looking for keywords that have a high traffic, high competition and low KC score.
Click on the result and ideally you want to see a minimum of 2 sites that have a Domain Authority of less than 30, with a KC of less than 30. This gives you a good indication that if you write a good article and with a little bit of SEO loving you could probably get your site to rank in those top 10 results as well.
In the case of hiking boots I can see a keyword (best hiking boots UK) that gets 140 visits a month and has a KC of just 22 so lets click on that:
finding a niche in the market
Unfortunately there’s only 1 site with a DA of less than 30, which has a pretty low KC of 24, so lets start by checking that site out. We can see straight away that it’s a niche site as it has a product comparison table, some reviews and a load of affiliate links : http://bestwalkingboots.org/
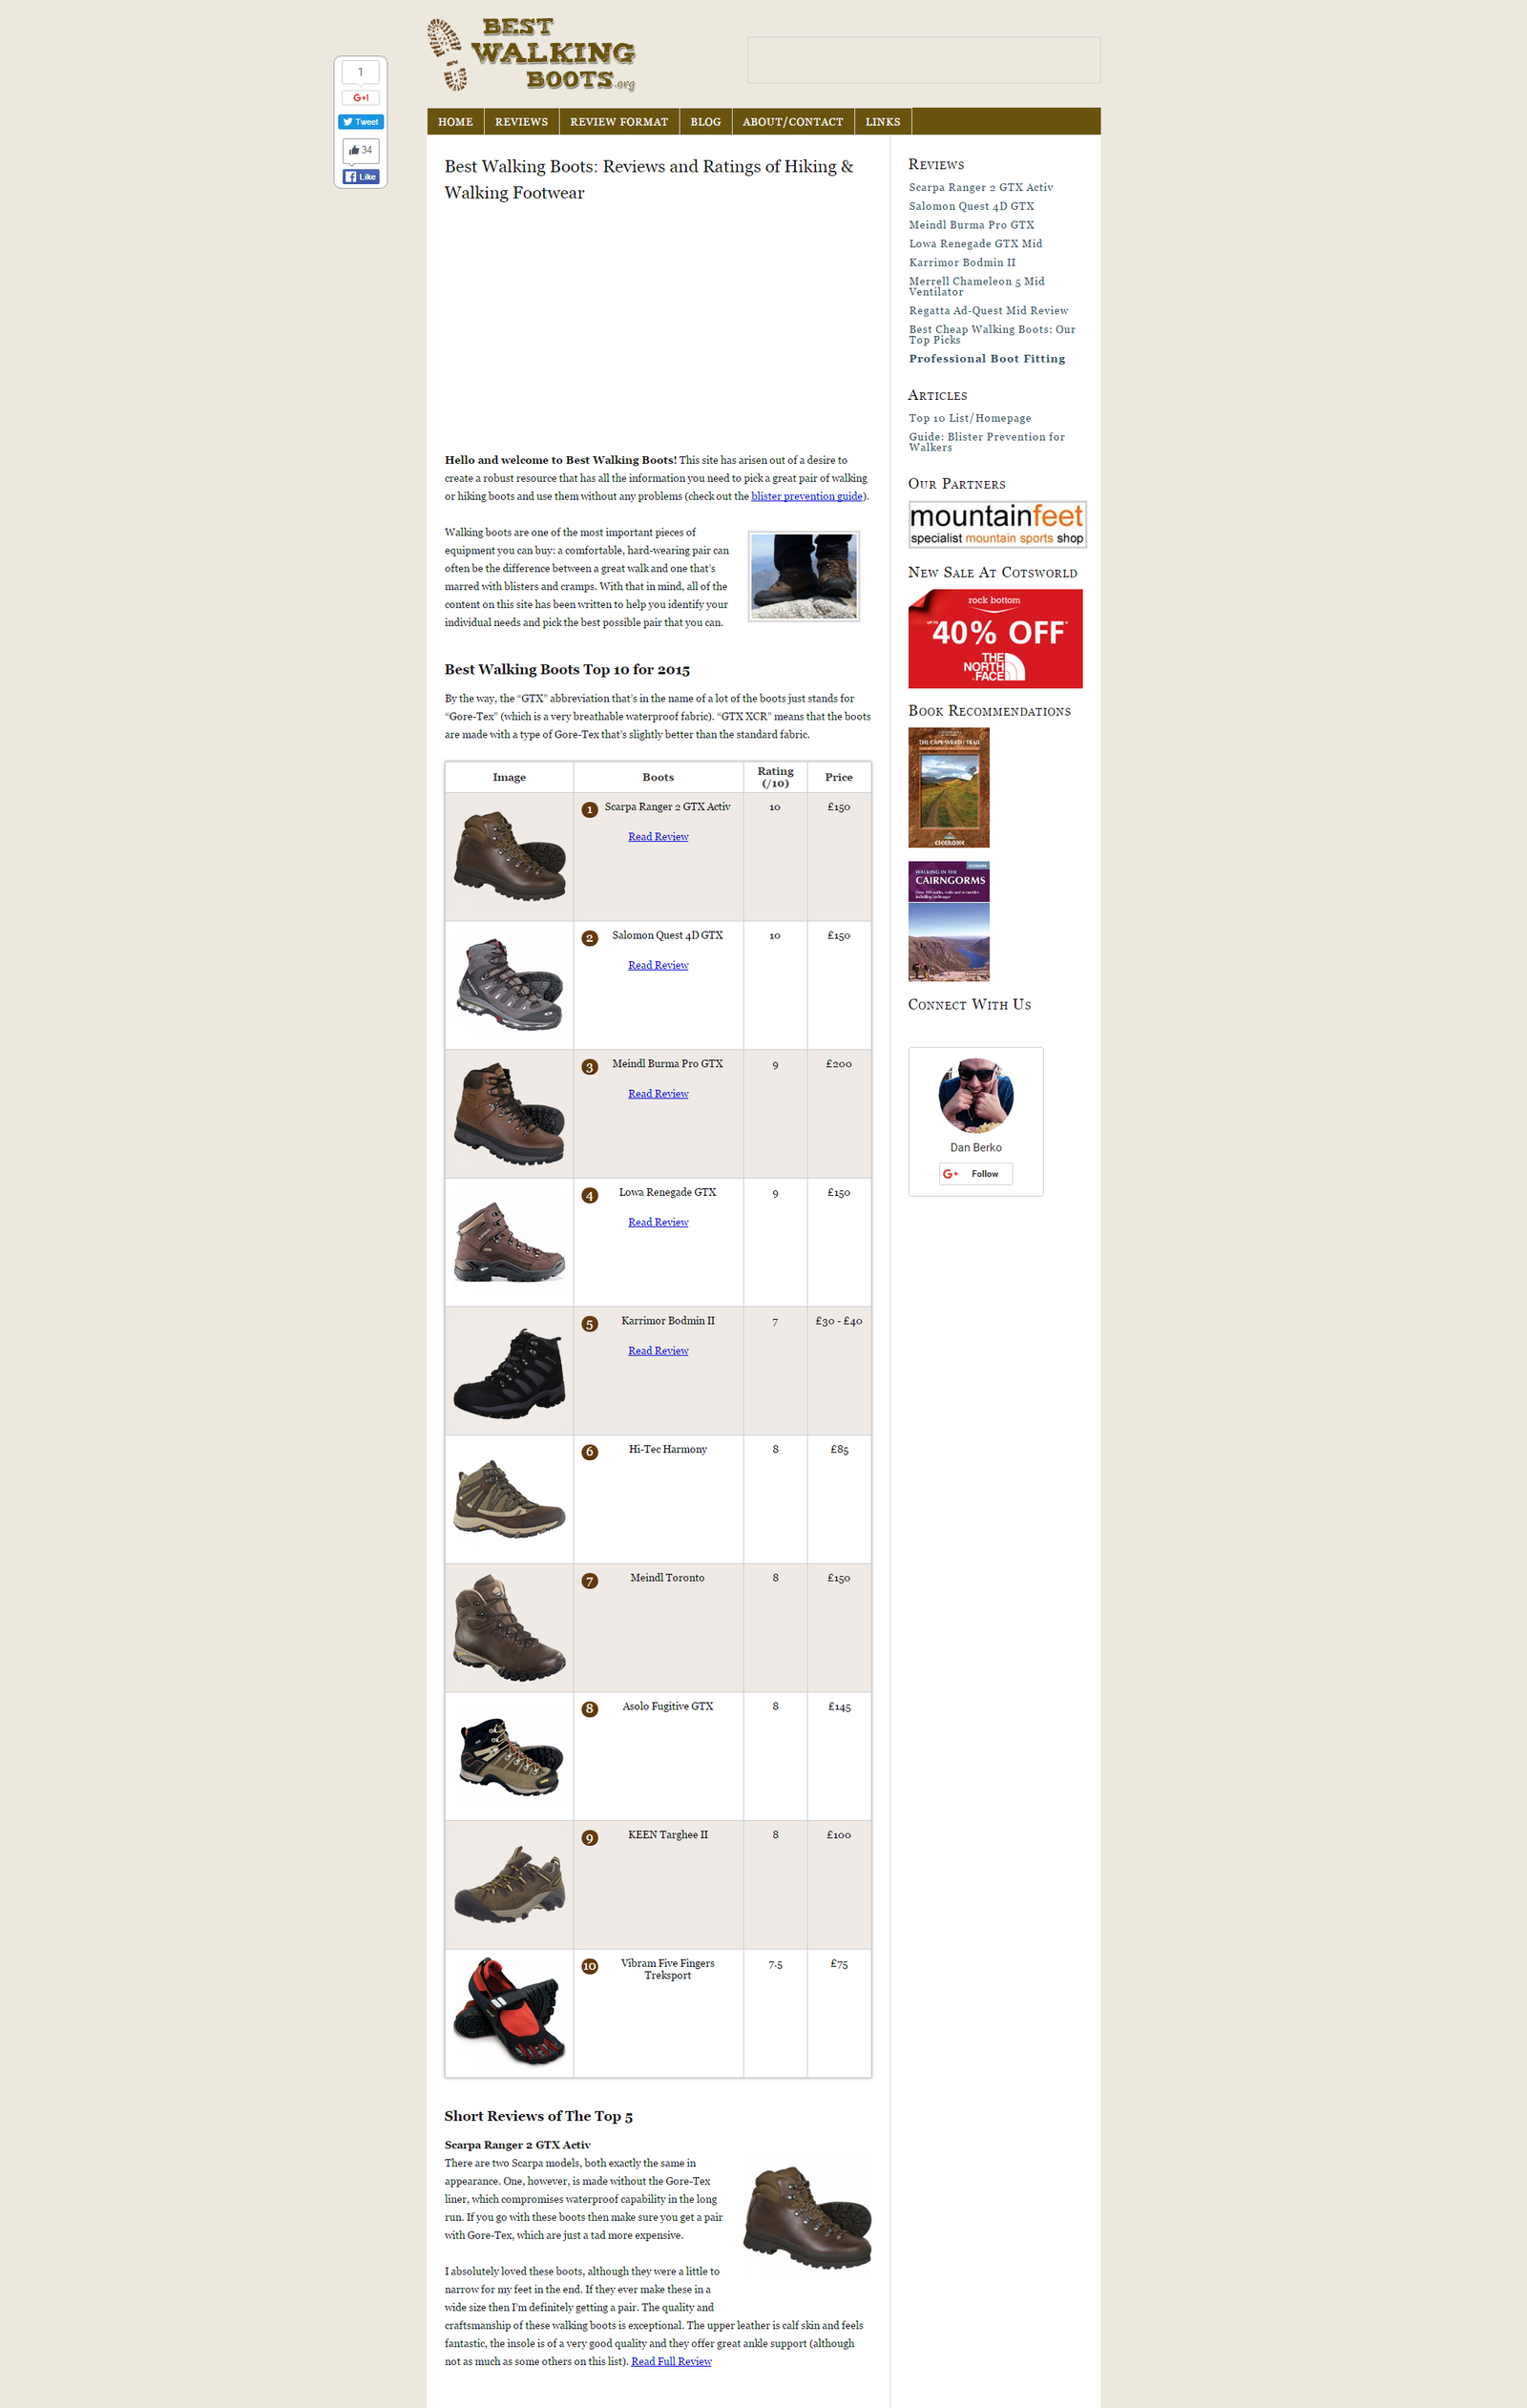
Best Walking Boots Reviews and Ratings of Hiking and Walking Footwear
Now the next little trick uses a tool cool SEMrush, which really just helps you to spy on the competition, look at how much traffic they are getting and then eventually steal their keywords! After all, all’s fair in love and keywords!!!
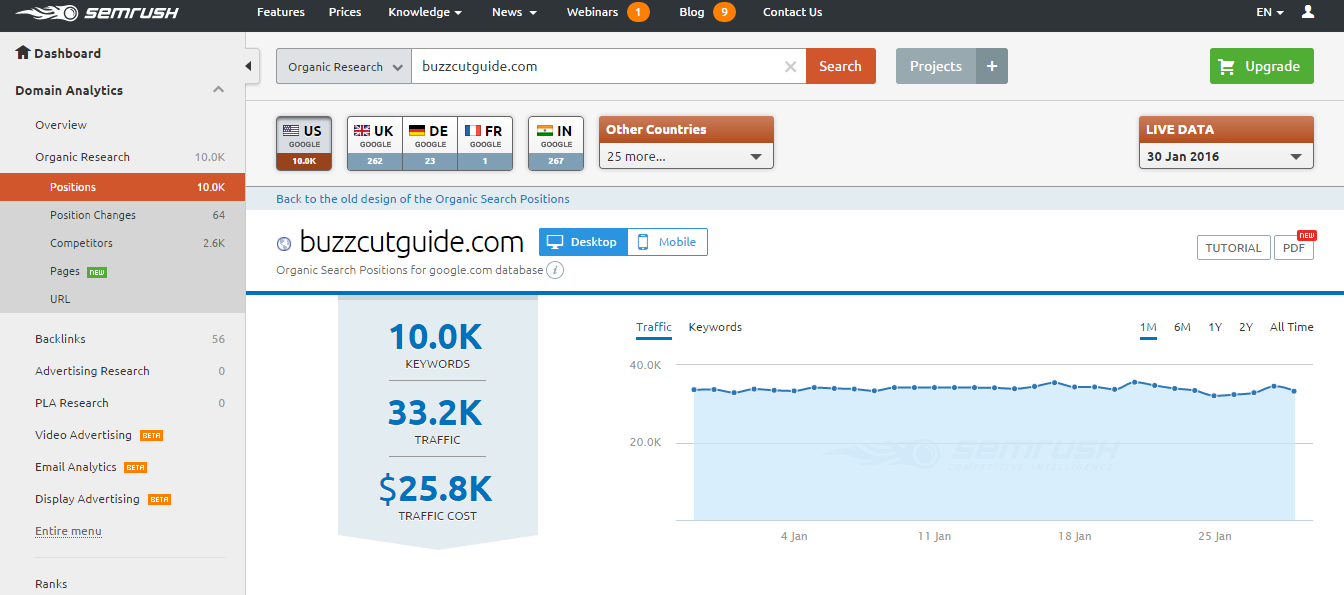
You can get 10 free searches a day with SEMrush, so head over to semrush.com and plug the url of the site you’re looking at into the search bar:
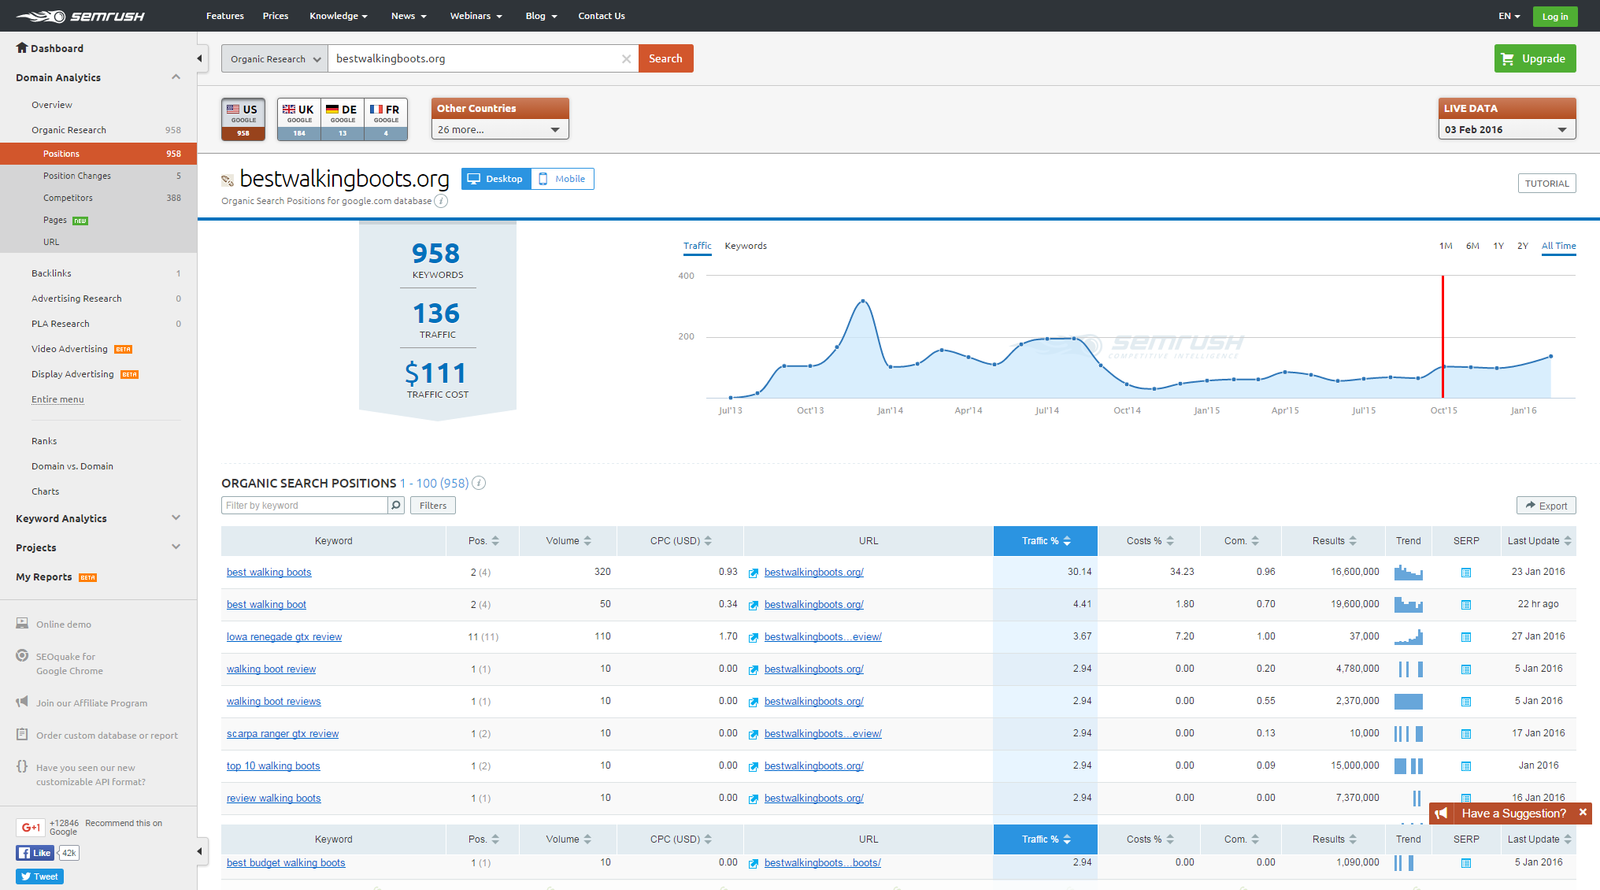
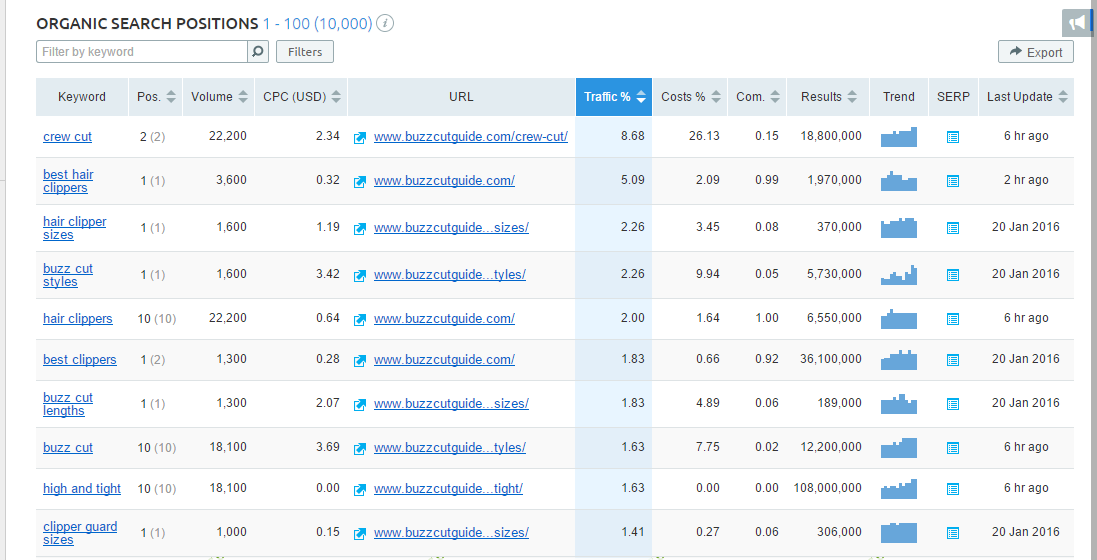
SEMrush : Organic Search Positions
Straight away you can see that SEMrsuh provides you with an estimate of the traffic the site is receiving, in this case 136 visitors a day, and then even better than this it shows you a complete list of the keywords that this site is ranking for and how much of their traffic volume this makes up. Simply click on the ‘export’ button and these keywords can be yours as well!!!
How to get keywords from a website”
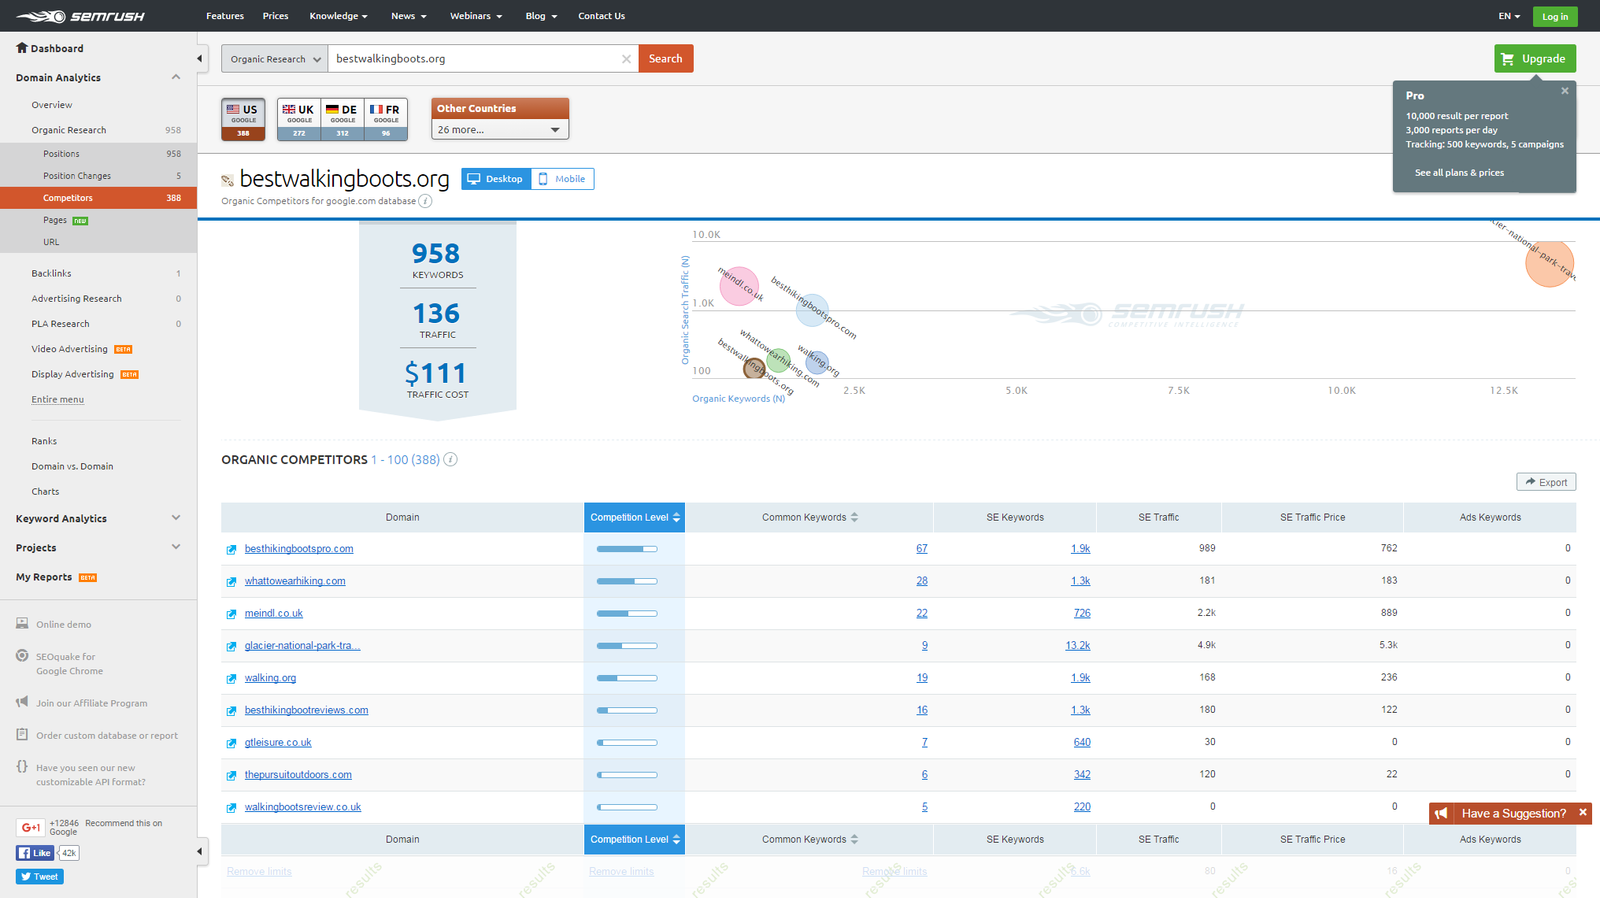
The other useful feature that you’ll see is the competitors graph, which gives you a list of related sites, and also plots them on a graph split between number of keywords and traffic. SEMrush has loads of great features and shows you how to find search volume for a keyword, how to find out keywords of a website and can really show you how to identify a niche market.
All of these things together give you a really useful insight into the competition and can help you understand whether this is a niche worth going into. When I went through this process it helped me to eliminate a number of niches, purely by the fact that the main competitors were getting so little traffic that it wouldn’t be worth my while entering that niche.
COPYCAT SITES
Another good tip is to try and find sites that are similar to how you imagine your site will become. If there are sites like this in the top ten then it’s a pretty good sign, so spend some time and analyse their sites as well.
Look at their traffic figures and check out their competition and keywords and this should give you a really good indication if you should go for this niche or not.
For each of your niches make a note of the number of sites that you found like this and jot down their traffic volume.
Step 6 – How to Choose a Niche Market?
Task Time : 10 Minutes Per Niche
Once you’ve gone through the above process for a number of different niches, you’ll quickly get a feel for whether there is any business value in the niche, whether it is easy to enter, and most of all whether it’s something you’re going to want to dedicate a lot of your time to in the next months.
My final check list for each niche that I looked at would be something like this:
- Does the niche interest or excite me enough that I could commit a lot of my time to?
- Are there a good range of products that I could create or promote in this niche?
- Is there enough scope in the niche for me to write a decent amount of content about? (100 articles or more)
- Out of my keyword sampling exercise, were there a decent number of keywords with KC scores of less than 30?
- Did I manage to find a lot of copycat sites for keywords that had a KC of less than 30?
- Was there a good volume of traffic in the market for my copycat sites?
- How could I make my site stand out from others in this niche?
- Is there potential to expand my niche into further markets/niches?
- Would I be proud of talking about this niche to my friends/family?
Summary
- Stage 1 – Create a shortlist of niches : 1 hour
- Stage 2 – Finding Product Keywords using Amazon Search : 10 Minutes per niche
- Step 3 – Use Keyword modifiers to expand your keyword list : 10 Minutes Per Niche
- Step 4 – Sample your Keywords for Keyword Competitiveness: 20 Minutes Per Niche
- Step 5 – Analyse the Competition: 10 Minutes Per Niche
- Step 6 – Choosing a Final Niche : 10 Minutes Per Niche